
If you want to sell products on Amazon, the first real step is to create an Amazon seller account. The process is not difficult, but it can feel confusing if you are new to Seller Central, selling plans, identity verification, business type options, tax information, and payment setup.
This guide walks you through how to create an Amazon seller account in 2026, what you need before you start, which selling plan to choose, how verification works, and what mistakes to avoid so your account setup does not get delayed.
You will also see where this step fits into the larger Amazon FBA journey. Opening the account is important, but it is only the beginning. After approval, you still need to understand fees, choose a product, create a listing, prepare inventory, and launch with a plan.
If you want the full beginner roadmap, read our complete guide on how to sell on Amazon FBA.
Quick Answer: How Do You Create an Amazon Seller Account?
To create an Amazon seller account, go to Amazon’s seller registration page, choose the Individual or Professional registration path, create or sign in with your Amazon account, verify your email and phone number, enter your business location and business type, add your personal, tax, payment, and payout details when requested, upload the required identity and address documents, and wait for Amazon to review and approve your account.
Before you start, prepare your government-issued ID, proof of address, bank or card statement if requested, phone number, credit or debit card, tax information, and business details if you are registering as a company.
For most serious Amazon FBA beginners, the Professional plan usually makes more sense because it gives access to more selling tools and removes the per-item selling plan fee. But if you only want to test a few items casually, the Individual plan may be enough to start.
If you are trying to understand how to create an Amazon seller account for the first time, the most important thing is to prepare your documents before opening the registration page.

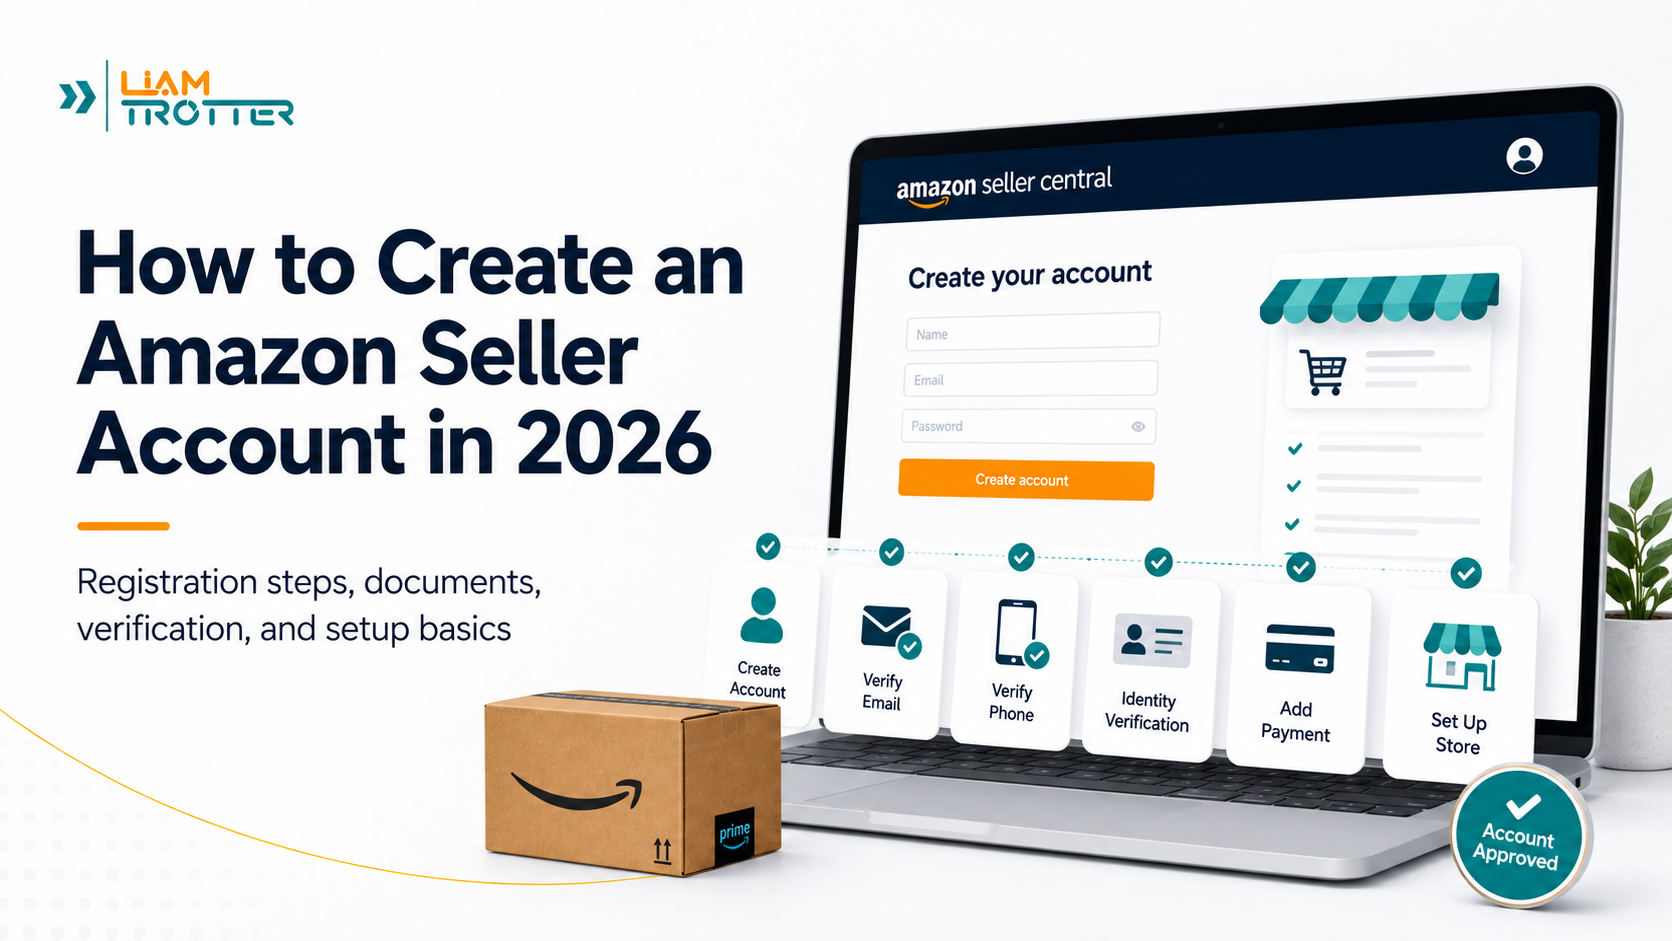
Amazon Seller Account Setup Steps at a Glance
The image above gives you a visual overview of the Amazon seller account setup process. The table below turns the same process into a text checklist, including the registration page, selling plan choice, verification steps, business details, payment setup, document upload, and final review.
| Step | What You Do | Why It Matters |
|---|---|---|
| Step 1 | Go to Amazon’s official seller registration page | Start from the correct registration path instead of a random login or help page. |
| Step 2 | Choose Individual or Professional | Your selling plan affects fees, tools, and how suitable the account is for a serious FBA launch. |
| Step 3 | Sign in or create your Amazon account | This account becomes the login you use to access Seller Central after registration. |
| Step 4 | Verify your email and phone number | Amazon uses these details for security, approval messages, and account recovery. |
| Step 5 | Enter your business location and business type | This affects the documents, tax information, and verification steps Amazon may request. |
| Step 6 | Add contact, payment, tax, and payout details | Amazon needs this information to verify you, charge account fees, and send future sales proceeds. |
| Step 7 | Enter your store and product information | Your answers help Amazon understand what you plan to sell and how your store will appear. |
| Step 8 | Upload identity and address documents | Clear, valid, matching documents reduce the risk of delays or rejection. |
| Step 9 | Wait for review and respond to Amazon if needed | Approval can take longer if Amazon needs extra documents, a video call, or clarification. |
What Is an Amazon Seller Account?
An Amazon seller account is the account that allows you to sell products in the Amazon store. Once you register and choose a selling plan, you can access Amazon Seller Central, where you manage your selling activity.
Seller Central is where you list products, adjust prices, manage inventory, monitor orders, review payments, check account health, use FBA tools, contact support, and access other seller programs.
In simple terms:
- Amazon seller account = your account that gives you permission to sell on Amazon.
- Seller Central = the dashboard where you manage that account.
Amazon seller account vs Seller Central account
Beginners often use these terms interchangeably, and that is understandable. In practice, when people say “create an Amazon seller account,” they usually mean registering as a seller and gaining access to Seller Central.
After your seller registration is approved, Seller Central becomes your main control center. You can use it to:
- create or manage product listings
- set or update prices
- monitor payments and refunds
- use FBA or manage your own fulfillment
- respond to return requests
- monitor account health
- access Seller University and support resources
- use tools such as Manage Inventory, Payments Dashboard, Account Health, Send to Amazon, and more
Your access to some tools can depend on your selling plan, whether you use Amazon Ads, and whether your brand is enrolled in Amazon Brand Registry.
What Do You Need to Open an Amazon Seller Account?
Before you open the registration page, prepare your information and documents. This makes the setup faster and reduces the chance of delays during verification.
Amazon requirements can vary by marketplace, country, business type, and verification situation. A seller registering for the U.S. marketplace may face different tax or document requirements than a seller registering in Europe, Japan, the UAE, India, or Brazil.
Before you spend money on samples, tools, or inventory, use our Amazon seller registration countries checker to see whether your country may be eligible and which marketplaces may be realistic for you.
Email address and phone number
Use an email address that you check regularly. Amazon will use it for verification, account updates, policy messages, support messages, and approval notices.
You should also use a mobile phone number you can access immediately. During setup, Amazon may send OTP codes by SMS or call, and you may need your phone again later for verification or account recovery.
Avoid using an email or phone number you rarely check. Missing an Amazon verification message can slow down your setup.
Government ID and address verification
Amazon may ask for a government-issued photo ID, such as a passport, national ID, driver’s license, or another accepted identity document depending on your country.
Your ID details should match the information you enter during registration. Pay attention to:
- first and last name
- date of birth
- ID number
- expiration date, if applicable
- country of issue
- address information, if shown
Amazon may also ask for proof of address. This can include documents such as a bank statement, credit card statement, utility bill, certified bank letter, tax document, rent or lease agreement, or another accepted document depending on your seller type and country.
The most important rule is simple: your documents should be clear, valid, complete, and consistent with the information you enter in Seller Central.
Bank account and payout details
You need a bank account or supported payout method so Amazon can send your sales proceeds. Requirements vary by marketplace and country.
In some marketplaces, your bank account may need to be located in a supported country. In other cases, you may be able to use Amazon Currency Converter or an approved payment provider.
Make sure the name and address connected to your bank or payout method do not create conflicts with your seller registration details. If Amazon asks for a bank statement, the document should be recent, readable, and match the account information you provide.
Credit or debit card for seller fees
Amazon usually requires a valid charge method, such as a credit or debit card, to pay selling plan fees, referral fees, advertising costs, or other charges.
Use a card that can support the required billing for your marketplace. Some prepaid cards or unsupported cards may cause setup or account access issues.
Tax information
You may need to complete a tax interview or provide tax information during registration. The exact requirement depends on your country, taxpayer status, and target marketplace.
For example, sellers registering for the U.S. marketplace may be asked to complete a tax interview that determines whether a W-9 or W-8BEN form is needed. Sellers registering for European marketplaces may need to consider VAT requirements before they can sell.
Tax rules can be complex, so use this section as general education only. Confirm your requirements with Amazon, your tax authority, and a qualified professional if needed.
Marketplace and country eligibility
Your country matters before you begin. Amazon does not accept seller registration from every country in the same way, and each marketplace can have different tax, document, bank, and compliance requirements.
For example, the U.S. store generally requires items such as a valid credit card, bank account, phone number, and tax information. European marketplaces may require VAT information to sell. Other regions may ask for additional documents such as passport, national ID, bank statement, or card statement.
This is why you should not treat “how to create an Amazon seller account” as a one-size-fits-all process. The best starting marketplace depends on where you live, which documents you can provide, whether you can receive payouts, and how simple or difficult the tax setup will be.
The requirements to create an Amazon seller account can vary by marketplace, so always check the registration flow for the store where you plan to sell.
Individual vs Professional Amazon Seller Account: Which Should You Choose?
Before you create your seller account, you need to choose a selling plan. Amazon has two main selling plans: Individual and Professional.
This choice affects your fees and the tools available inside Seller Central. It is not the same thing as choosing whether to sell as an individual person, sole proprietor, LLC, or company. A selling plan is an Amazon account plan. Your legal or tax structure is a separate question.
Individual selling plan
The Individual plan is a pay-as-you-go plan. It has no monthly subscription fee, but Amazon charges a per-item fee when you sell an item.
This plan may make sense if:
- you only plan to sell a few items
- you are testing casually
- you do not expect to sell more than 40 items per month
- you want to avoid a monthly subscription while learning
- you do not need advanced tools yet
The main drawback is that the Individual plan has fewer tools and is less suitable for a serious FBA launch.
Professional selling plan
The Professional plan has a monthly subscription fee but gives access to more advanced selling tools and programs.
This plan may make sense if:
- you expect to sell more than 40 items per month
- you are building a serious Amazon FBA business
- you want access to bulk listing tools
- you plan to advertise with Amazon Ads
- you want more reporting and business tools
- you plan to scale beyond casual testing
For most beginners following a structured Amazon FBA launch, the Professional plan is usually the more practical option. It gives you access to the tools you are more likely to need as you build your first product listing and launch.
Which plan is better for beginners?
If you are only experimenting with a few items and want to keep account-level costs low, start with Individual.
If you are planning a real Amazon FBA launch with product research, inventory, listing optimization, PPC, and long-term selling goals, start with Professional.
Here is a simple comparison:
| Selling plan | Cost structure | Best for | Beginner note |
|---|---|---|---|
| Individual | Per-item fee when an item sells | Casual sellers and very low-volume testing | Good if you only want to test a few items before committing to a more serious Amazon FBA launch. |
| Professional | Monthly subscription fee | Serious sellers, regular sales, FBA launches, and scaling | Usually better for structured Amazon FBA launches because it unlocks more selling tools and programs. |
This comparison is for general planning only. The right selling plan depends on your expected sales volume, budget, tool needs, and launch strategy.
You can switch plans later if your needs change, but do not choose a plan randomly. Think about your sales volume, budget, tool needs, and launch strategy before you register.
Amazon Seller Account Terms Beginners Often Confuse
A lot of Amazon seller account confusion comes from using different business terms as if they mean the same thing. They do not.
Understanding these terms before registration can help you choose the right setup and avoid mistakes.
Individual selling plan vs selling as an individual
The Individual selling plan is an Amazon pricing plan. It means you pay per item sold instead of paying a monthly Professional subscription.
Selling as an individual means you are not registering through a separate business entity. During registration, Amazon may let some sellers choose a business type such as “None, I am an individual,” depending on their situation.
These are related, but they are not the same thing.
You could choose an Individual selling plan as a low-volume seller, or you could choose a Professional selling plan while still registering as an individual or sole proprietor if that matches your situation and country requirements.
Business type vs LLC
Your business type during Amazon registration is not automatically the same as forming an LLC.
Amazon may ask whether you are registering as an individual, sole proprietor, privately owned business, or another type depending on your marketplace and registration flow. That helps Amazon understand who is opening the account and what documents may apply.
An LLC is a legal business structure. You usually do not need an LLC just to open an Amazon seller account as a beginner. Many sellers start as individuals or sole proprietors, then consider forming an LLC later if the business becomes more serious, risky, profitable, or complex.
Read our full guide on do you need an LLC to sell on Amazon if you are unsure whether you should form one before registering.
Seller account vs business license
An Amazon seller account is not the same as a business license.
Amazon may not require every beginner to provide a business license just to open a seller account. But your local government, tax authority, supplier, bank, insurance provider, product category, or target marketplace might require separate documents depending on where and how you sell.
Think of it this way:
- Amazon seller registration is one layer.
- Local business rules are another layer.
- Tax registration is another layer.
- Supplier, banking, insurance, and product compliance rules can be separate layers too.
For a deeper breakdown, read our guide on whether you need a business license to sell on Amazon.
Amazon seller account vs Amazon Business account
An Amazon seller account lets you sell products in the Amazon store.
An Amazon Business account is usually connected to buying for a business, not becoming a third-party seller.
If your goal is to sell products on Amazon, you need an Amazon seller account and access to Seller Central. Do not confuse this with opening an Amazon Business buyer account.
How to Create, Open, and Set Up an Amazon Seller Account Step by Step
The quick checklist above gives you the overview. Now let’s walk through how to create, open, and set up an Amazon seller account step by step, including the seller registration page, Seller Central account setup, verification, business information, payment details, store setup, document upload, and final review.
Before you begin, keep your government ID, proof of address, phone number, payment card, and business details nearby if you are registering as a company.
Step 1: Start on the Amazon Seller Registration Page
Start by visiting Amazon’s official seller registration page. This is where you choose the registration path that matches the selling plan you want.
If you want the Professional plan, click the main Sign up button near the top of the page. If you want the Individual plan, scroll down and click the link that says something like Sign up to become an individual seller.
This is where the selling plan choice usually begins. Amazon does not always show a separate plan-selection screen later, so choose the correct path before continuing.

Step 2: Sign In or Create Your Amazon Account
After choosing your registration path, Amazon takes you to the Seller Central sign-up screen.
If you already have an Amazon account that you want to use for selling, sign in and continue. If you do not have one, scroll down and click Create your Amazon account.
Use an account and email address that you are comfortable using for business communication, because Amazon will send verification messages, approval notices, and account updates to this email.

Step 3: Enter Your Name, Email, and Password
On the account creation page, enter your name, email address, password, and password confirmation. Then click Next.
Use your real name and an email address you check regularly. Do not use an email inbox you rarely open, because missing Amazon verification messages can delay your setup.

Step 4: Review the Welcome Page and Click Begin
After creating or signing in to your account, Amazon shows a welcome page that explains what to expect during seller registration.
This page is useful because it reminds you to prepare the documents and information you may need before continuing. Review it quickly, make sure your details are nearby, then click Begin.

Step 5: Complete Two-Step Verification
Amazon then asks you to complete two-step verification. Enter your phone number, request the one-time password, and type the code into the verification field.
Use a mobile number you can access immediately. You may need this number again later for security, account recovery, or additional verification.

Step 6: Verify Your Email Address
Amazon also asks you to verify your email address. Open the email from Amazon, copy the one-time passcode, paste it into the verification field, and continue.
If you do not see the message, check your spam, promotions, or updates folder before requesting another code.

Step 7: Enter Your Business Location and Business Type
Next, enter your business location and choose your business type. This is an important step because it affects the information and documents Amazon expects from you.
If you do not own a registered business, use the country where you currently live or where you are actually doing business from. If you are self-employed, choose the option that best matches your situation. If you are not registering a company, Amazon may offer an option such as None, I am an individual.
Do not choose a business type just because it sounds more professional. If you select a registered business type, your documents should support that choice.
Enter your details exactly as they appear on your official documents before continuing.

Step 8: Enter Primary Contact Information and Verify Your Phone
After entering your business information, fill in the primary contact person details. This can include your country of residence, country of birth, full legal name, address, date of birth, and mobile number.
Make sure the information matches your official documents. Differences in spelling, address format, or date of birth can create verification problems.
Amazon then sends an SMS PIN to your phone. Enter the code in the verification pop-up and click Verify.

Step 9: Add Payment Information
Next, go to the payment information page and enter your card details. This usually includes your card number, expiration date, and cardholder name.
Use a valid credit or debit card that can handle the required billing for your marketplace. Some prepaid or unsupported cards can cause setup problems.
Amazon uses this payment method for seller account fees and other account-related charges. Depending on your marketplace and setup, payout or bank details may also be requested during registration or later inside Seller Central.

Step 10: Enter Your Store Name and Answer Product Questions
After payment information, enter your Amazon store name and answer the product-related questions.
Your store name is the public-facing seller name customers may see in the Amazon store. Choose something simple, professional, and not misleading.
Amazon may ask whether your products have UPC codes, whether you manufacture your products, whether you are a brand owner, or whether you represent a brand.
Answer these questions based on your real setup. If you are sourcing from a supplier and have not built your own registered brand yet, do not claim that you are the manufacturer or brand owner unless that is actually true.
For the UPC question, answer based on the product and listing strategy you plan to use. Some products may require a valid product identifier, while others may qualify for a GTIN exemption depending on the product, brand setup, and Amazon’s listing requirements.

Step 11: Upload Identity and Address Verification Documents
Finally, upload your identity and address verification documents. Amazon may ask for a passport, national ID, driver’s license, bank statement, credit card statement, utility bill, or business document depending on your country and business type.
Your documents should be clear, valid, complete, readable, authentic, and consistent with the information you entered during registration.
- Do not upload blurry or cropped documents.
- Do not use expired documents.
- Do not edit or alter your documents.
- Do not upload password-protected files.
- If Amazon asks for both sides of an ID, upload both sides.
- If a document is not in an accepted language, Amazon may ask for a notarized translation.

In some cases, Amazon will ask you to complete identity verification through a live video call after you submit your documents. If this happens, prepare your device, camera, microphone, internet connection, original ID document, and any bank or card statement Amazon requested.

Once everything is submitted, wait for Amazon to review your account. Check your email regularly and respond carefully if Amazon asks for more information. After approval, you can access Seller Central and continue with the next step of the Amazon FBA process.
How Much Does It Cost to Create an Amazon Seller Account?
The cost to create an Amazon seller account depends mainly on the selling plan you choose.
Amazon has two main selling plans:
| Plan | Cost | Best for |
|---|---|---|
| Individual | $0.99 per item sold | Very low-volume sellers, casual testing, or beginners who only want to sell a few items. |
| Professional | $39.99 per month | Serious sellers, regular sales, structured FBA launches, and beginners who need more selling tools. |
These are selling plan fees. They are not the same as the full cost of starting an Amazon FBA business.
Once you begin selling, other costs may apply, such as referral fees, FBA fulfillment fees, storage fees, Amazon Ads, product photography, inventory, shipping, and tools.
For a deeper breakdown of fees after you start selling, read our guide to Amazon FBA fees.
Opening your account is only one cost layer. Launching a real FBA product usually requires a larger budget for samples, inventory, freight, listing assets, PPC, and unexpected costs.
If you want a realistic launch budget, read our guide on how much it costs to start Amazon FBA.
How Long Does Amazon Seller Account Verification Take?
Amazon may review your documents and contact you if clarification is needed. The exact timeline can vary depending on your country, business type, document quality, and whether Amazon asks for extra information.
In many cases, Amazon may review submitted information within a few business days, but approval can take longer if:
- your documents are unclear
- your name or address does not match
- your business information is incomplete
- your bank or card statement is not accepted
- your country or marketplace has extra requirements
- Amazon requests a video verification call
- Amazon asks you to resubmit documents
If Amazon asks you to resubmit documents, take the request seriously and respond within the allowed window. Do not upload random replacements. Read the reason carefully and provide documents that match Amazon’s instructions.
Common Amazon Seller Account Approval Issues and How to Avoid Them
Many account setup delays happen because of small details that could have been fixed before submission.
Many delays happen because beginners try to create an Amazon seller account before their documents, payment method, and business information are ready.
Here are the most common issues to avoid.
Document names or addresses do not match
Your name and address should match across your application and documents.
If your ID uses one version of your name, your bank statement uses another, and your Seller Central application uses a third version, Amazon may have trouble verifying you.
Before submitting, compare your:
- Seller Central registration information
- government ID
- proof of address
- bank or card statement
- business documents, if applicable
Use the same legal name and address format wherever possible.
Blurry, cropped, or outdated documents
Amazon may reject documents that are hard to read, cropped, incomplete, expired, edited, or unclear.
Use high-quality scans or photos. Make sure the full document is visible, including all edges. If the document has information on the back, provide the back as well if Amazon requires it.
Avoid screenshots of documents unless Amazon specifically allows them. Use the original file, scan, or clear photo instead.
Unsupported or mismatched bank account
Your bank account or payout method must be supported for the marketplace where you are registering.
If your bank statement is requested, it should show the correct name, address, bank name, and other required details. If your payout method does not match your account information or is not supported, your setup can be delayed.
Choosing the wrong business type
Do not choose a business type just because it sounds more professional.
If you are not registering a company, do not claim to be a registered business. If you are registering through an LLC or other entity, make sure you can provide the required business documents.
Choosing the wrong business type can trigger document requests you cannot satisfy.
Trying to create multiple seller accounts
Do not open multiple Amazon seller accounts casually.
Amazon may allow more than one account only in specific situations, but you generally need a legitimate business reason and should follow Amazon’s rules. Creating multiple accounts without permission can lead to account problems or suspension.
If you already have or previously had a seller account, be careful before creating another one.
Ignoring Amazon verification emails
Amazon may contact you by email if it needs clarification or additional documents.
Use an email address you check daily during registration. Also check spam and promotions folders. If Amazon gives you a deadline to submit documents, do not miss it.
What to Do After Your Seller Account Is Approved
Once your Amazon seller account is approved, do not rush into buying inventory immediately. Take the next steps in order.
Knowing how to create an Amazon seller account is only the first step; the real work begins when you start researching products, estimating fees, and preparing your launch plan.
Start by logging in to Seller Central and reviewing your account settings. Check your payment information, tax information, notification settings, and account health dashboard.
Then continue with the next parts of the Amazon FBA process:
- Understand Amazon selling fees and FBA fees.
- Choose a simple product direction.
- Research demand and competition.
- Validate profit after product cost, shipping, Amazon fees, and PPC.
- Find and vet suppliers.
- Prepare your listing and product images.
- Create your product listing.
- Prepare inventory and send it to Amazon FBA.
- Set your price and launch with PPC.
- Request reviews after launch.
Continue with the full how to sell on Amazon FBA beginner guide to follow the complete step-by-step process.
Frequently Asked Questions
Here are some common questions beginners ask before creating an Amazon seller account, choosing a selling plan, and completing account verification.
You can create an account with the Individual selling plan without a monthly subscription fee, but you still pay a per-item fee when an item sells, plus other selling fees. The Professional plan has a monthly subscription fee plus selling fees.
Opening an account is also not the same as launching an Amazon FBA product. Inventory, shipping, FBA fees, listing assets, PPC, tools, and business setup costs may still apply.
Requirements vary by marketplace and seller type, but Amazon commonly asks for a valid credit or debit card, phone number, tax information, bank account or payout method, identity information, and verification documents such as a passport, national ID, bank statement, credit card statement, or proof of address.
If you register as a business, Amazon may ask for business documents as well.
Yes, you usually need a bank account or supported payout method so Amazon can send your sales proceeds. The exact bank requirements depend on the marketplace and country.
Some marketplaces support certain countries or currency conversion services, while others may have more specific requirements.
Yes, many beginners can register as individuals or sole proprietors if they meet Amazon’s requirements. This does not automatically mean the Individual selling plan is the best choice.
You can be an individual seller from a business-structure perspective while choosing the Professional plan if that fits your launch goals.
No, you usually do not need an LLC just to create an Amazon seller account. An LLC can be useful later for business structure, banking, liability separation, partners, or scaling, but it is not automatically required for every beginner.
Read more in our guide on do you need an LLC to sell on Amazon.
You should not create multiple Amazon seller accounts casually. Amazon may allow multiple accounts in specific cases, but you generally need a legitimate business reason and must follow Amazon’s policies.
If you create another account without permission or proper justification, you may risk account problems.
Yes, Amazon allows sellers to switch selling plans. If you start with Individual and later decide to scale, you can upgrade to Professional.
If you switch from Professional to Individual, some tools or programs may no longer be available, and certain services may require a Professional plan.
Read Amazon’s request carefully and submit exactly what it asks for. Make sure the document is valid, clear, complete, unedited, not password-protected, and consistent with your registration information.
Do not keep resubmitting random documents. Fix the specific issue Amazon identified.
Final Thoughts
Creating an Amazon seller account is not just a formality. It is the foundation for everything you do next as an Amazon seller.
The best approach is to prepare your documents before registration, choose the right selling plan, check whether your country and marketplace are realistic, enter your information carefully, and take identity verification seriously.
For most serious Amazon FBA beginners, the account setup process is only step one. After your account is approved, your next job is to understand your costs, choose the right product, build a strong listing, prepare inventory correctly, and launch with a clear plan.
If you are ready to continue, go back to our complete guide on how to sell on Amazon FBA in 2026 and move to the next step: understanding Amazon FBA fees and selling costs.
