
If you want to understand how to sell on Amazon FBA, you have probably seen conflicting advice. Some people describe it as a life-changing opportunity, while others say it is no longer worth the effort. The truth lies somewhere in between.
This Amazon FBA for beginners guide is designed for people who want a practical, step-by-step path to selling their first product on Amazon. You will learn how FBA works, how much it may cost to get started, how to find and validate a product, how to source from suppliers, how to prepare your listing and inventory, and how to launch with a realistic plan instead of guessing.
If you are looking for a step-by-step way to start selling on Amazon FBA, use this guide as your roadmap from eligibility and startup costs to product research, sourcing, listing, shipping, launch, and reviews.
What Is Amazon FBA?
Amazon FBA, which stands for Fulfillment by Amazon, is a program where you send your products to Amazon’s warehouses, and Amazon then handles storage, packing, shipping, customer service, and returns. Your main job is to choose the right product, source it from a reliable supplier, and build a strong listing. Amazon takes care of the fulfillment side.
Success in 2026 no longer comes from shortcuts or guesswork. Amazon still offers a real opportunity, but it rewards sellers who approach it with research, patience, and strong execution.
This guide is different from most beginner articles. It does not just offer general advice. It gives you an Amazon FBA step by step framework with clear instructions, real examples, and practical tools you can use immediately. By the end, you will have a much clearer understanding of how to launch and grow an Amazon FBA business.
Is Amazon FBA Worth It in 2026?
Yes — Amazon FBA is still worth it in 2026, but it is no longer easy or beginner-proof.
Amazon still has massive buying demand. By 2025, Amazon accounted for about 40.4% of U.S. retail ecommerce sales, and more than half of online shoppers begin their product searches on Amazon. That shows how central the platform still is to online buying behavior.
Key Amazon FBA Facts
Amazon accounted for about 40.4% of U.S. retail ecommerce sales by 2025.
More than 60% of Amazon store sales come from independent sellers.
Independent sellers generated over $1 million in annual sales.
Independent sellers still have real room to grow on Amazon. In the U.S., they averaged more than $290,000 in annual sales in 2024, and more than 55,000 generated over $1 million.
What has changed is the difficulty level. Weak products, poor listings, rushed launches, thin margins, and unrealistic expectations are much less likely to work today. New sellers need better product research, clearer cost planning, stronger listings, and more controlled inventory decisions.
That does not mean the opportunity is gone. It means Amazon FBA now works best for people who treat it like a real business, understand the numbers, and build a stronger offer than the average competitor.
So, is Amazon FBA still worth it? Yes — for the right seller. It can still be one of the most practical ways to start an ecommerce brand, but it now rewards strategy, patience, margin control, and execution far more than hype.
For a deeper breakdown of the pros, cons, costs, risks, and beginner decision factors, read our full guide: Is Amazon FBA worth it in 2026?
The next question is how much it actually costs to get started.
How Much Does It Cost to Start Amazon FBA?
A realistic Amazon FBA startup cost depends on your product, your first order size, your shipping method, and how lean or aggressive you want your launch to be. If you are learning how to start Amazon FBA, the goal is not to chase the lowest possible number. The goal is to build a controlled budget that covers inventory, shipping, setup, and a modest launch.
In the example used throughout this guide, we use a relatively simple product and start with an initial order of 200 units to keep the launch more controlled and reduce inventory risk. If the product costs around $4 to $5 per unit, the initial inventory would cost about $800 to $1,000.
From there, the total budget rises once we add account fees, product identification such as a GTIN or barcode, shipping, tools, and launch costs.
For a simple product with a controlled first order, a lean but structured launch may fall around $1,400 to $1,900. However, many beginners will need a larger budget once they include better listing assets, PPC testing, extra shipping room, samples, and a safety buffer.
For a deeper breakdown of beginner launch budgets, cost ranges, and examples, read our full guide on how much it costs to start Amazon FBA.
After reading the full cost breakdown, you can also use the Amazon FBA cost calculator to estimate your own launch budget before buying inventory.
Here is a practical budget breakdown for a simple product launch:
This is why there is no single fixed answer to how much it costs to start selling on Amazon. Even within the same business model, the total can change based on product size, supplier location, shipping method, inventory quantity, and how aggressively you launch.
What many new sellers underestimate is that Amazon FBA fees are layered. You are not only paying for inventory. You may also pay account fees, referral fees, inbound shipping, product ID or barcode costs, and FBA fulfillment fees, which vary by size, shipping weight, and price tier.
The Product ID / GTIN or barcode cost in the table should be treated as a planning estimate, not a fixed rule. Some products may require a valid product identifier, while other sellers may qualify for a GTIN exemption depending on the product, brand setup, and Amazon’s listing requirements.
Some costs are optional. Premium packaging, professional photography, third-party inspection, paid research tools, and trademark registration can all increase your launch budget. These may become useful later, especially if you are building a long-term private label brand, but they are not always necessary for a smaller first launch.
The key point is simple: budget for more than inventory. A controlled first launch should leave room for shipping, Amazon fees, product setup, PPC testing, and unexpected costs.
Once you understand the startup budget, the next question is whether FBA is actually the right fulfillment model for your business.
Amazon FBA vs. FBM: Which Fulfillment Model Is Right for You?
The core difference is simple: with FBA, Amazon stores your inventory and handles packing, shipping, customer service, and returns. With FBM, you store the inventory and fulfill orders yourself.
The right choice depends less on which model is “better” in general and more on how you want to run your business.
Quick Comparison: FBA vs FBM
| Factor | Amazon FBA | Amazon FBM |
|---|---|---|
| Storage | Amazon stores inventory | You store inventory yourself |
| Packing and shipping | Amazon handles both | You handle both |
| Customer service and returns | Amazon manages both | You manage both |
| Prime access | Easier path to Prime benefits | Possible through SFP, but more complex |
| Control | Lower | Higher |
| Time savings | Higher | Lower |
| Best for | Simpler operations, easier scaling | Flexibility, hands-on control |
Which One Should You Choose?
FBA is often the better choice when:
- You want to save time on operations
- You want Amazon to handle customer service and returns
- You plan to grow sales volume over time
- You want a simpler path to Prime shipping visibility
FBM is often the better choice when:
- You want full control over inventory and order handling
- Your products need custom packaging or special care
- You already have your own storage and shipping setup
- Your catalog is small, specialized, or less predictable
The Middle Ground
You do not have to choose only one. Many sellers use both models depending on the product. A faster-moving product may work better with FBA, while a slower, heavier, or more customized item may be easier to keep under FBM. The right model can vary by product, not just by business.
For most beginners, FBA is the easier model to build around at the start because it removes much of the operational complexity. FBM remains a strong option in the right situations, especially when control matters more than convenience.
Think about your product type, how much time you want to spend on fulfillment, how much control you need, and how quickly you want to scale.
Before moving into the practical setup steps, the next thing to check is whether you are actually eligible to sell on Amazon from your country and which marketplaces are available to you.
Before You Start: Are You Eligible to Sell on Amazon?
Before learning how to sell on Amazon FBA, you need to answer one basic question: are you actually eligible to register as a seller from your country?
Not every country has the same access to Amazon seller registration. In some cases, you may be able to register with your personal documents. In others, you may need additional tax information, marketplace-specific requirements, a supported payout method, or business documents depending on where and how you plan to sell.
If you are unsure whether you need to form a company before registering, read our guide on whether you need an LLC to sell on Amazon. It explains when individual registration may be enough and when a business structure may make sense later.
This matters because eligibility comes before product research, inventory, shipping, and Amazon FBA costs. If you cannot register properly or receive payouts, the rest of the plan is not ready yet.
Use our Amazon seller registration countries eligibility checker to see whether your country may be accepted, which Amazon marketplaces may fit, and what documents, tax steps, or payout requirements you may need.
In general, the U.S. marketplace is often one of the simplest starting points for many international sellers, while regions such as the EU, the UK, the Gulf, Brazil, or India may involve additional VAT, company formation, local tax registration, or compliance requirements. The best choice depends on where you live and how you want to structure your business.
Before learning how to sell on Amazon FBA, you need to answer one basic question: are you actually eligible to register as a seller from your country?
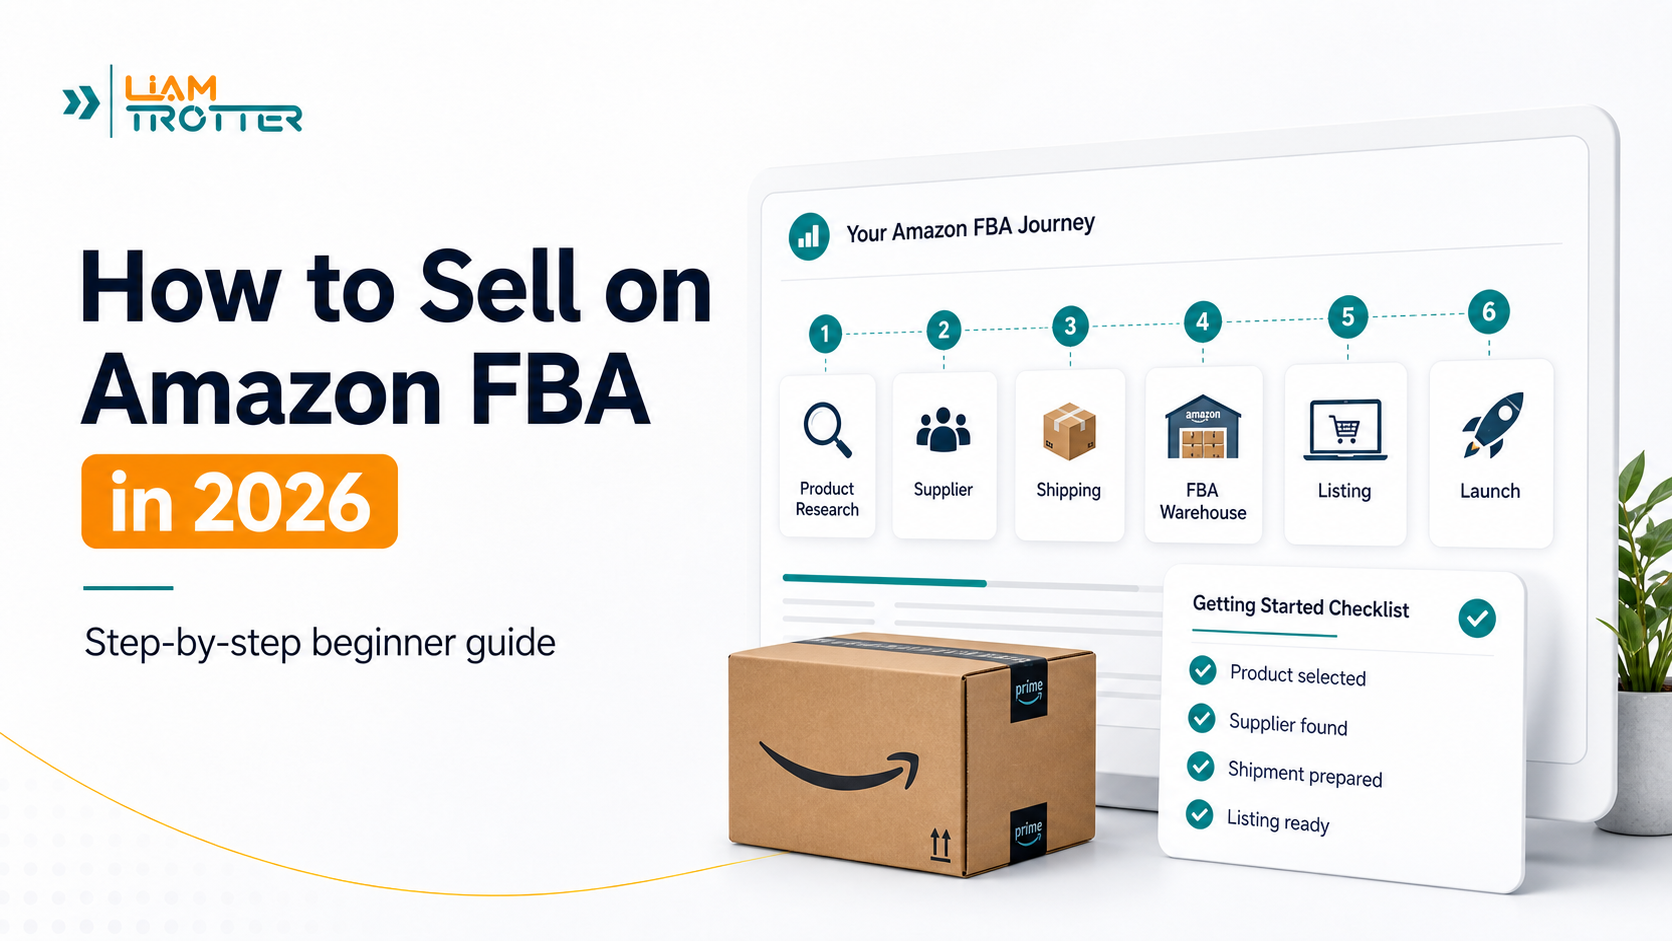
How to Start Amazon FBA Step by Step
If you want to know how to start Amazon FBA step by step, the process starts with choosing the right selling plan, understanding your costs, finding a product, validating demand, sourcing inventory, creating your listing, sending products to Amazon, and launching with a clear plan.
The steps below show you how to start selling on Amazon FBA in a practical order, from creating your seller account to preparing inventory, setting your price, running PPC, and requesting reviews after launch.
Step 1: Create Your Amazon Seller Account
To start selling, the first real action is to create your Amazon seller account. Amazon’s registration flow takes you through several screens, including selling plan selection, account creation, phone and email verification, business information, payment details, store setup, document upload, and final approval.
This section gives you a quick walkthrough of the process. For a more detailed guide covering selling plans, required documents, verification steps, common approval issues, and setup mistakes, read our full guide on how to create an Amazon seller account.
Before you open the registration page, prepare the essentials Amazon may ask for during setup:
- a valid government-issued ID or passport
- a bank account or card statement
- a valid credit or debit card
- a working mobile phone number
- your business details, if you are registering as a company
Having these ready will make the process faster and help you avoid delays.
Individual vs Professional Seller Account: Which Should Beginners Choose?
Before starting the registration flow, decide which selling plan fits your situation. The Individual plan can work if you only want to test selling a very small number of units, while the Professional plan is usually the better choice if you are planning a serious Amazon FBA launch.
Since this guide follows a structured product launch, the Professional plan will usually make more sense for most readers. You can still review the cost difference in the startup budget section above before making your final decision.
1. Start by visiting the Amazon seller registration page. If you want the Professional plan, click the main Sign up button near the top of the page. If you want the Individual plan, scroll down and click Sign up to become an individual seller. Choose the path that matches the selling plan you selected before continuing.

2. After choosing your path, Amazon takes you to the Seller Central sign-up screen. If you already have an Amazon buyer account, you can use it to continue. If you do not, click Create your Amazon account.

3. On the account creation page, enter your name, email address, and password, then re-enter the password and click Next. Use an email address that you check regularly, because Amazon will use it for verification, account updates, document requests, and approval notices.

4. After that, Amazon shows a welcome page explaining what to expect and which documents you should have ready before continuing. Read it quickly, make sure your details are nearby, then click Begin.

5. Next, Amazon asks you to complete two-step verification by entering your phone number and requesting an OTP. Use a mobile number you can access immediately.

6. Amazon also asks you to verify your email address. Open the email, copy the OTP, enter it into the field, and continue.

7. On the next screen, enter your business location, choose your business type, and fill in your personal or business details. If you do not own a registered business, use the country where you currently live. If you are self-employed, choose the option that best matches your situation. If you are not registering a company, choose None, I am an individual if that option appears.
Enter your details exactly as they appear on your official documents before continuing.

8. Next, fill in the primary contact person information, including your country of residence, country of birth, address, date of birth, and mobile number. Amazon will then send an SMS PIN to your phone. Enter the code in the verification pop-up and click Verify.

9. Next, go to the Payment Information page and enter your card number, expiration date, and cardholder name. Use a valid card that can handle the required billing for your marketplace.

10. Then enter your store name and answer the product-related questions. For the UPC question, choose the answer that matches your listing plan. In this guide, we will use products with a UPC and explain product identifiers later. If you are sourcing from a supplier and have not built your own registered brand yet, do not claim that you are the manufacturer or brand owner unless that is actually true.

11. Finally, upload your identity and address documents on the Identity and Address Verification page. Amazon may ask for a passport or driving licence, along with a bank or card statement. Make sure the documents are clear, valid, complete, and consistent with the information you entered.

In some cases, Amazon will ask you to complete identity verification through a live video call. Before joining, make sure your device, camera, microphone, internet connection, and documents are ready. Once everything is submitted, wait for Amazon to review and approve your account. After approval, you can access Seller Central and move on to the next step.
Common mistakes to avoid include entering a name or address that does not match your documents, choosing the wrong business type, using blurry or outdated verification documents, using an email or phone number you do not check regularly, and rushing through identity verification without preparing for a possible video call.
Once your account is approved, the next step is to understand Amazon FBA fees and selling costs, because these costs will affect your margins, pricing, and product decisions from the beginning.
Step 2: Understand Amazon FBA Fees and Selling Costs
Before you choose a product, you need to understand the Amazon fees that can affect your margins.
Your profit does not depend only on sourcing cost and shipping. It also depends on the core selling fees Amazon charges and the FBA costs tied to fulfillment, storage, returns, and inventory management.
At this stage, you do not need to memorize every Amazon fee table. But you do need to understand the main fee layers before you judge whether a product is profitable.
Core Amazon seller fees
The first group of costs includes the basic fees Amazon charges at the selling level, whether you fulfill orders yourself or use FBA.
One example is your selling plan fee. Amazon has an Individual plan that charges per item sold and a Professional plan with a monthly fee. This is one of the first fee layers in your business model, but it is not the only one.
The more important selling-level cost is the referral fee. This is Amazon’s commission on each sale. It is usually charged as a percentage of the sale price, and the percentage can vary by product category.
This matters because two products with the same selling price can have different profit margins if they are in different fee categories.
Core FBA fees
If you use Fulfillment by Amazon, Amazon adds another layer of costs on top of the basic selling fees.
The most important FBA cost is the FBA fulfillment fee. This is a per-unit fee Amazon charges to pick, pack, ship, and support customer service for FBA orders. The fee depends mainly on product size, shipping weight, dimensional weight, and fee category.
You also need to think about storage fees. Amazon charges monthly storage fees based on how much space your inventory occupies in its fulfillment centers. Storage can become more expensive during Q4 and can hurt your margin if inventory moves slowly.
Other FBA-related costs may include inbound placement fees, aged inventory surcharge, low-inventory-level fees, returns processing fees, removal fees, and disposal fees.
This is why beginners should not estimate profit by looking only at product cost and selling price. A product can look attractive at first, then become weak once Amazon fees, shipping, PPC, returns, and storage are included.
Before ordering inventory, check the current fee rules for your category and make sure the product still has enough margin after all major costs are included.
For a full breakdown of referral fees, fulfillment fees, storage fees, inbound placement costs, return-related fees, and 2026 fee changes, read our detailed guide to Amazon FBA fees.

Step 3: How to Find a Profitable Product to Sell on Amazon
Now that you understand Amazon’s basic fee structure, the next step is choosing the right product. This is where many beginners go wrong: they start with a product they personally like instead of a product the market is already willing to buy.
A good Amazon product is not just something that looks interesting or seems easy to sell. It should show real customer demand, manageable competition, and enough room for profit after Amazon fees, shipping, and sourcing costs.
This section gives you the quick product-selection framework. If you want a deeper guide to finding product ideas, using Amazon search, Best Sellers, reviews, trends, and product filters, read our full guide on how to find products to sell on Amazon.
What Makes a Profitable Product on Amazon?
At a high level, a profitable product usually stands on three basics:
- Steady demand: people are already searching for it and buying it consistently.
- Manageable competition: the market is not completely locked down by entrenched sellers or established brands.
- Healthy profit potential: the product still leaves enough margin after Amazon fees, fulfillment, shipping, and sourcing costs.
Here is the simplest way to think about it:
| Trait | Why it matters |
|---|---|
| Small and lightweight | Lower shipping, storage, and fulfillment costs |
| Steady demand | Better chance of consistent sales |
| Manageable competition | Easier market entry |
| Healthy margin | More room for profit after all costs |
| Easy to source | Fewer supply and quality issues |
| Low compliance risk | Fewer approvals, restrictions, and delays |
From there, refine your choice using these practical filters:
- Choose products that are easy to ship and store. Smaller, lighter products are usually easier to handle, cheaper to move, and simpler to protect.
- Look for room to improve the existing offer. Strong opportunities often come from products that already sell, but still have weak listings, recurring complaints, poor packaging, or quality gaps you can fix.
- Stay away from highly seasonal products at the beginning. A short selling window can make demand unstable and leave you with excess inventory at the wrong time.
- Avoid products that are fragile or perishable. These add more risk in shipping, storage, and customer satisfaction.
- Choose products you can source reliably from multiple suppliers. A product is safer when it is not tied to one unstable source or one supplier with inconsistent quality.
- Make sure the margins still work after all costs. Demand alone is not enough. A product can sell well and still be a poor choice if fees, shipping, and sourcing costs leave too little profit.
- Avoid niches dominated by established brands. If a category is already controlled by powerful brands, it becomes much harder to compete on trust, reviews, and conversion.
- Use data, not personal taste. Do not choose a product because you like it. Choose it because the market shows clear demand, the competition is workable, and the numbers leave room for profit.
Quick Reminder: A product can look popular and still be a bad opportunity if the margin is thin, the niche is crowded, or the product brings shipping or compliance headaches.
Products to Avoid as a Beginner
Not every product that sells well is a good product to start with. Some items are simply too risky, too regulated, too fragile, or too complex for a beginner FBA business.
Here is the quick filter:
| Product type | Main risk |
|---|---|
| Heavy or oversized items | Higher shipping and storage costs |
| Fragile products | More damage and returns |
| Perishable products | Shelf-life and spoilage issues |
| Complex electronics | More support issues and higher returns |
| Approval-heavy categories | Extra documents and listing restrictions |
| Hazmat or battery-related products | Compliance reviews and FBA complications |
Here are the main product types to avoid early on:
- Heavy or oversized products: these usually bring higher shipping, storage, and fulfillment costs, which can quickly destroy your margin.
- Fragile products: if a product breaks easily, it creates more packaging problems, more returns, and more customer-service headaches.
- Perishable or short-shelf-life products: these are harder to manage and can create waste, spoilage, and storage losses.
- Complex electronics: products with technical issues, compatibility questions, or support needs often bring higher return rates and more operational friction.
- Products dominated by major brands: if the niche is already owned by powerful brands, it becomes much harder to compete on trust, reviews, and conversion.
- Products with high return risk: items with fit, sizing, compatibility, or performance confusion are often harder for beginners to manage profitably.
- Restricted or approval-heavy products: some products and categories cannot be listed freely and may require prior approval. Amazon may ask for recent invoices, product photos, brand authorization letters, or safety certifications before you can sell them. In some cases, one product may require more than one approval.
- Products in commonly restricted categories: categories such as Automotive, Beauty, Clothing & Accessories, Grocery & Gourmet Foods, Health & Personal Care, Jewelry, Luggage & Travel Accessories, and Shoes, Handbags, Sunglasses, and Watches may require approval, which makes them less beginner-friendly.
- Products with compliance or safety risk: this is not just an inconvenience. Amazon’s restricted-products policy warns that violations can lead to serious enforcement actions, including suspension or termination of selling privileges, inventory destruction or return, and withholding of payments.
- Battery-powered, chemical, aerosol, or hazmat-risk products: ordinary consumer goods such as laptops, smartphones, household cleaners, spray paints, cosmetics, power banks, and battery-powered items can fall into dangerous-goods review. That adds complexity most beginners do not need in their first product.
- Products that require extra documentation from the start: some battery and hazmat-related items may require dangerous-goods information, an SDS, or an exemption sheet. Missing or conflicting information can delay review or block the product from FBA.
- Products prohibited from FBA: some products are not just difficult, but unsuitable for the FBA program itself. Amazon’s FBA-specific restrictions include certain dangerous-goods classes and other products the program will not accept.
The practical lesson is simple: do not make your first product harder than it needs to be. Your first win should come from a product that is straightforward to source, easy to ship, low-risk from a compliance standpoint, and simple to manage operationally.
Once you know what a good product looks like—and what product types to avoid—you are ready for the next step: using product research tools to generate ideas and validate whether a product is actually worth pursuing.
Step 4: Do Amazon FBA Product Research and Validate Your Idea
Once you understand what a good Amazon FBA product looks like, the next step is not to choose a product immediately. The next step is to validate the idea.
A product idea is not the same thing as a product worth ordering. A product may look interesting, show sales estimates, or appear in a product research tool and still be a bad opportunity if the margin is weak, the niche is too competitive, the product is difficult to ship, or customers already have better options.
The goal of Amazon FBA product research is to check demand, competition, reviews, profit potential, FBA fit, restrictions, supplier options, and differentiation before you spend money on samples or inventory.
In this beginner guide, we will keep the process practical. We will use the same working example from the next steps of this guide: a weed removal tool. The goal is not to say this product is guaranteed to win. The goal is to show how a product idea moves through a simple validation process before you contact suppliers.
A simple product research workflow looks like this:

This workflow keeps you from making a decision too early. You are not trying to find a perfect product from one tool or one number. You are trying to collect enough signals to decide whether the idea deserves deeper work.
Start With Product Criteria, Not a Guess
Before using tools, define the type of product you are willing to research. This keeps you from chasing every product that looks exciting for a few seconds.
For a beginner, useful product criteria may include:
- clear demand from real shoppers
- manageable review counts and competition
- a selling price that can leave room for profit
- small or manageable size and weight
- low restriction or compliance risk
- simple product design
- several possible suppliers
- a clear way to improve the offer
This does not mean every product must be small, cheap, or easy. It means you should know what would make a product realistic for your budget, experience level, and launch plan.
If you are still collecting product ideas and do not yet have anything to validate, start with our guide on how to find products to sell on Amazon. That step comes before deeper product research.
Check Niche Demand Before You Focus on One Product
Once you have a product idea, look at the broader niche before focusing too much on one listing. A niche with one strong product and weak activity everywhere else may be riskier than it looks.
Amazon Product Opportunity Explorer can help here because it shows Amazon-side niche data inside Seller Central. Instead of looking only at one product, you can review customer search behavior, related products, click share, pricing, reviews, trends, and other signals that help you understand whether the market has real customer demand.
For example, before choosing a weed removal tool, you would want to understand whether shoppers are actively searching for that type of garden tool, whether demand is growing or seasonal, whether several products get clicks, and whether customers are satisfied with the products already available.
A good niche signal does not prove the product is worth selling. It only tells you that the idea may deserve deeper validation.
Build a Shortlist With Black Box or Similar Tools
After checking the niche, you can use product research tools to build a shortlist faster. Tools like Helium 10 Black Box, Jungle Scout, AMZScout, and other product databases can help you filter product ideas by category, price, sales, revenue, reviews, rating, weight, size, fulfillment type, and other signals.
The important point is this: a filtered result is not a final decision. Black Box can help you find products worth checking, but it cannot tell you by itself whether the product is profitable, easy to source, safe to sell, or realistic for your budget.
In our example, the weed removal tool stood out because it showed signs of demand, a reasonable selling price, manageable weight, and a simple product type. That made it worth adding to the shortlist, but not worth ordering yet.

Validate the Market With Xray or Similar Tools
After you build a shortlist, open Amazon and validate the market directly. This is where tools like Helium 10 Xray inside the Chrome Extension can help.
Search Amazon for the main keyword related to your product idea, then review the live search results. Useful signals include total revenue, average revenue, average price, BSR, review count, recent purchases, parent-level sales, ASIN-level sales, FBA fees, active sellers, size tier, sales history, and variation structure.
Do not look at one strong product and assume the niche is good. Look for market spread. A healthier opportunity usually has several listings making sales, not one dominant seller taking all the demand.
Also watch review depth. If every top listing has thousands of reviews and strong brand presence, the niche may be difficult for a beginner even if demand is strong.
For the weed removal tool example, Xray helps you move from “this looks interesting in a product database” to “this niche has real activity on Amazon, and the competition may still be worth reviewing.”

Check Profitability, Reviews, and FBA Fit
Strong demand is not enough. A product can sell well and still be a weak Amazon FBA product if the fees, shipping, PPC, return risk, or storage costs destroy the margin.
Before moving forward, check the full profit picture. Estimate the selling price, product cost, shipping, packaging, prep, Amazon referral fees, FBA fulfillment fees, storage, PPC, returns, and a safety buffer.
You should also study reviews carefully. Reviews can reveal what customers like, what they dislike, and where current products fail. Repeated complaints about durability, packaging, size, instructions, or missing accessories can become possible differentiation ideas.
Finally, check whether the product makes sense for FBA. Look at size, weight, packaging, fragility, storage risk, prep requirements, and restrictions. A product that is heavy, oversized, fragile, gated, hazmat-related, or compliance-heavy may be harder for beginners even if the demand looks attractive.
For the weed removal tool, the product stayed interesting because it was simple, non-technical, relatively lightweight, and had room for improvement through better presentation, clearer messaging, stronger packaging, and review-based product improvements.
Decide Whether to Reject, Research More, or Shortlist
Product research should end with a decision. Do not keep researching forever, but do not buy inventory too early either.
Put the product idea into one of three buckets:
At this stage, the weed removal tool is not guaranteed to succeed. No product is. But it has enough positive signals to keep researching instead of rejecting it immediately.
For that reason, we will use the weed removal tool as the working product example in the next steps of this guide. Now that we have identified and validated a promising product idea, the next step is finding a reliable supplier that can source or manufacture it for us.
Step 5: Find Reliable Amazon FBA Suppliers for Your Product
Even a strong product idea can fail if the supplier is unreliable. This part matters just as much as product research.
For this guide, we will continue with the same example: a weed removal tool. To source it, we will start with Alibaba, one of the most widely used platforms for finding Amazon FBA suppliers.
Start Your Search on Alibaba
Create an account on Alibaba.com, then type your product keyword into the search bar. In our example, that would be something like weed remover tool or weed puller tool.
Use practical filters such as Trade Assurance, Verified Supplier, Alibaba Guaranteed, and store ratings of 4.5 and above to narrow down the results.

The most useful filters to start with are:
| Filter | Why It Matters |
|---|---|
| Trade Assurance | Adds payment and order protection through Alibaba |
| Verified Supplier | Supplier business details have been checked |
| Alibaba Guaranteed | Highlights listings with additional platform-backed protection |
| Store Reviews (4.5+) | Helps you avoid weak suppliers with poor feedback |
| Country/Region | Useful if you want to compare domestic and overseas sourcing |
Once filtered, browse carefully. Focus on suppliers already selling products in the same niche as your target item.
Shortlist and Vet Potential Suppliers
Build a shortlist of about 10 to 15 suppliers. Review each profile for:
| What to Check | Why It Matters |
|---|---|
| Manufacturer or trading company | Manufacturers usually offer better pricing, quality control, and customization |
| Product relevance | The supplier should already make products in the same niche |
| Years in business | More experience can suggest more stability |
| MOQ | Helps you judge whether the supplier fits your budget and launch plan |
| Verification and profile strength | A complete profile gives more confidence than a weak one |
| Customization ability | Useful for logo, color changes, or packaging upgrades |

Key check: is the supplier a manufacturer? Manufacturers usually give you better prices, more control over quality, and more flexibility if you want to customize the product later.
Also make sure the supplier works in your product category. A garden tool supplier is a much better fit for a weed remover than a supplier focused on unrelated items.
Do not judge a supplier on one detail alone. A newer supplier with a strong profile and good communication may still be worth considering.
Contact Suppliers the Right Way
Your first message should be short, clear, and professional. Include:
- a short introduction
- the exact product you are interested in
- MOQ
- unit price at different quantities
- sample cost, including shipping
- lead time
- customization options such as logo, color, or packaging
If you already know you want to improve the product, this is the right moment to ask about simple customization options.
Send a Simple Initial Supplier Message
Here is a simple message template you can use and adjust when contacting suppliers:
Hello,
My name is [Your Name], and I am an Amazon seller interested in your weed removal tool.
Could you please share the following details for this product:
- Minimum Order Quantity (MOQ)
- Unit price for different quantities, such as 100, 200, 500, and 1000 units
- Sample cost, including shipping
- Estimated lead time for sample and production
- Available customization options, such as logo, color, or packaging
I look forward to your reply.
Best regards,
[Your Name]
Important Tips for Safe and Effective Sourcing
- Customize each message so it is clear you reviewed the supplier’s profile
- Negotiate price and MOQ because listed prices are often starting points
- Request a sample before full production
- Request an updated sample if you plan to customize the product
- Start with a smaller order if possible to reduce risk
- Keep communication on Alibaba whenever possible, because moving too early to WhatsApp or another outside platform may weaken Trade Assurance protection
Important: Do not place your final production order until you create the product listing in Seller Central and confirm that the product is eligible to be sold on Amazon. Some products or categories may require approval, compliance documents, or special conditions. If you skip this step, you could end up paying for inventory that Amazon will not allow you to sell.
Your goal is not to find the cheapest supplier. It is to find the best balance of reliability, quality, communication, and workable terms.
Now that we know how to find and evaluate suppliers, the next step is preparing the product listing and building it the right way.
Step 6: Prepare and Optimize Your Amazon Product Listing
Now that you have chosen your product and found a supplier, the next step is preparing your Amazon listing before creating it in Seller Central. This matters because your listing does more than describe the product. It helps Amazon understand what you are selling, helps the right shoppers find it, and makes the offer more convincing once they land on the page.
Understand the Core Elements of an Amazon Product Listing
An Amazon product listing is the product detail page shoppers see when they click on a product on Amazon. It brings together the main information customers use to evaluate the item, including the title, images, bullet points, description, and reviews.
As shown in the image below, these elements work together to explain what the product is, communicate its value, and help shoppers decide whether they want to buy it. In other words, your listing is not just a product page. It is one of the biggest factors influencing visibility, trust, and conversion.

The main listing elements are:
- Title: clearly tells Amazon and shoppers what the product is.
- Images: give shoppers a quick visual understanding of the product.
- Bullet points: highlight the main features, benefits, and selling points in an easy-to-scan format.
- Description: adds more context, explains the product in greater detail, and supports the buying decision.
- Reviews: help build trust and influence purchase decisions.
These elements should work together as one complete sales page. A clear title improves understanding, strong amazon bullet points make the offer easier to scan, a persuasive amazon product description adds depth, and good images help build trust faster than words alone.
That is why amazon listing optimization is not just about adding keywords. It is about preparing each part of the listing in a way that helps Amazon understand the product correctly and helps shoppers quickly see why it is worth buying.
Note: The product description and customer reviews appear further down the Amazon product page, so scroll down to view them.
What You Need Before Creating the Listing
Before creating your listing, make sure you have two essentials ready: the correct product identifier, if your product requires one, and the right product category.
For product identifiers, Amazon may require a valid GTIN, such as a UPC or EAN, depending on the marketplace and product type. In simple terms, GTIN is the general identifier, while UPC and EAN are common formats used in different markets.
| Marketplace | Common Product ID Type |
|---|---|
| United States | UPC |
| Europe | EAN |
| Many other international marketplaces | EAN is commonly used |
If your product needs one, make sure you get it from a legitimate barcode provider before starting the listing process. For example, some sellers buy their codes from providers such as Nationwide Barcode, then use the appropriate format based on the marketplace where they plan to sell.
The second requirement is choosing the right category. Amazon organizes products into a detailed hierarchy of amazon product categories, and selecting the correct one matters because it affects how your product is classified, which attributes you may need to complete, and how easily the right shoppers can find it.
A practical way to choose the right category is to study successful competitors selling products similar to yours. As shown in the images below, you can identify the category in two simple ways:
- Use the Helium 10 Chrome Extension to spot the category directly in the search results.
- Open competitor product pages and check the Product Information section to see the full category path.

This makes it much easier to place your product in the most relevant category instead of guessing.
Once you have the correct GTIN and a clear product category, you are ready to start preparing the actual content of your listing.
Use Helium 10 Listing Builder AI to Draft and Optimize Your Listing
Once you understand the core elements of a strong listing, the next step is preparing them in a more structured and optimized way. This is where tools like Helium 10 Listing Builder become useful.
Instead of writing everything from scratch and guessing which keywords to include, the tool helps you organize your research, draft your content faster, and improve your overall amazon listing optimization process before creating the actual listing in Seller Central.
To begin, log in to Helium 10 and open Listing Builder from the listing optimization section. On the first screen, choose Create from scratch, as shown in the image below, then select the marketplace where you plan to sell.

After that, the tool takes you through the main stages of building your listing. As shown in the next image, the process is typically divided into three parts: adding keywords, creating listing content, and generating images.
Build Your Keyword Bank
The first step is building your keyword bank. This is a major part of amazon keyword optimization, because the quality of the keywords you choose will directly affect your title, bullet points, and description.
A practical way to do this is by using Helium 10 Cerebro to extract keywords from competing listings. Search for your product on Amazon, choose a few strong competitors, then copy their ASINs from the Product Information section and paste them into Cerebro. The tool will return a list of keywords those products are ranking for, which gives you a much stronger starting point than guessing keywords manually.
Once you review the keyword results, keep only the terms that are closely related to your product and genuinely useful for amazon product listing optimization. Then move to Listing Builder and add those keywords to your keyword bank using Add From My List or Manually Add Keywords, as shown in the images below.
If you use the manual option, paste your selected keywords line by line into the keyword field, and click Apply.

After that, Listing Builder moves your keywords into the Keyword Bank, where you can review them with additional performance data. As shown in the image below, this screen helps you quickly spot stronger keywords and remove weak or less relevant ones before moving to the content stage.

You do not need to overanalyze every metric here, but it is worth doing a quick cleanup so your listing is built around the most relevant and promising terms.
Generate and Refine Your Listing Content
After your keyword bank is ready, the tool moves to the content creation stage. Here, your selected keywords appear on one side, while the main listing fields appear on the other, including the title, bullet points, and description.
Before generating the content, fill in the product details as accurately as possible. This may include the product name, key features, use case, target audience, and other relevant characteristics. As shown in the image below, the more precise your input is, the better the AI can produce useful draft content.

You can also guide the tone of the writing based on your product and audience. For example, the text may need to sound more professional, informative, or persuasive depending on what fits the product best.
Once your inputs are ready, click Write for me. The tool will generate a draft for the title first, based on your selected keywords and product details. As shown in the image below, review the suggestion carefully before accepting it. If the result is strong, click Use Suggestion. If not, generate another version and compare.
Repeat the same process for the bullet points and description. This helps you draft faster while keeping your most important keywords in focus.
Still, AI should help you move faster, not replace your judgment. Always review the output manually to make sure it is accurate, clear, and aligned with your product. Strong amazon bullet points should be specific and benefit-driven, while a strong amazon product description should add useful detail without sounding generic or repetitive.
As shown in the listing analysis panel, Helium 10 also provides feedback on best practices. This can include checks related to title length, bullet point structure, keyword usage, and other quality signals. Use this section as a final review layer to improve weak areas before moving on.
Generate Supporting Product Images
Once the written content is in place, the final stage inside the tool is image generation. As shown in the image below, you can upload a clear product image, choose the image size, and guide the AI with a short description of the scene you want to create.

For better results, start with a clean product image, ideally with a white or simple background. Then describe the visual scene as clearly as possible. The more precise your prompt is, the better the generated result is likely to be. You can also adjust extra options such as the overall theme, theme setting, product scale, and advanced settings to guide the output more accurately.
Once everything is ready, click Generate Images. The tool will create draft visuals based on your instructions, which can help you prepare supporting listing images faster.
At the same time, AI-generated images are only one option. If you already have a physical sample, you may be able to photograph it yourself if the quality is good enough. You can also work with a professional photographer or designer for more polished results, or use supplier images when they are genuinely high quality and accurately represent the product.
Whatever method you use, the goal is the same: your images should look clear, realistic, useful, and consistent with the actual product.
By the end of this process, you do not need a perfect final listing yet. What you need is a strong working draft: a well-prepared title, bullet points, description, keyword bank, and supporting visuals ready to be used when you create the listing inside Seller Central.
Now that your listing elements are prepared and optimized, the next step is adding the product inside Seller Central and entering all of this information in the right place.
Step 7: Add Your Product in Seller Central
Now that your listing content is prepared, the next step is to enter it into Amazon Seller Central and create the actual product listing. This is where your draft becomes a live listing structure inside Amazon’s system.
Start a New Product Listing in Seller Central
Log in to your Amazon Seller Central account. From the top menu, click Add Products. This will take you to the List Your Products page, where Amazon gives you several ways to create a new listing.
Since you are adding a new product from scratch, choose Blank form, as shown in the image below, then click Start.

At this stage, you will also see two settings on the left side: Listing Language and Attributes. Choose the listing language based on the marketplace where you plan to sell. For example, if you are selling on Amazon US, choose English.
For Attributes, it is generally better to choose All attributes. This gives you access to more fields and allows you to provide more complete product information, which can make the listing more accurate and informative.
Note: In Seller Central, fields marked with an asterisk (*) are required and should be completed before submitting the listing. Fields without an asterisk are usually optional and can often be filled in later if needed.
Enter the Product Name and Confirm the Product Type
The first step inside the form is entering the product name in the Item Name field. Here, you can enter the product title you prepared earlier, or at least the main product name Amazon will use to identify the item.
Once you enter the name, Amazon will automatically suggest a Product Type based on it. If the suggested type is accurate, click Confirm.
If it is not accurate enough, click Select other. Amazon will then open a separate window that lets you search manually and choose a more suitable product type from the available categories.

This is where the category research you did earlier becomes especially useful. If needed, go back to a similar competitor listing on Amazon, open the Product Information section, and check the category path there. Then choose the closest matching product type in Seller Central.
Once the correct product type is selected, Amazon will load the full listing form and unlock the remaining sections you need to complete.
Complete the Product Identity Section
The first full section is Product Identity. This section defines how Amazon recognizes your product inside its catalog.
Here, fill in the main fields such as:
- Item Type Keyword: choose the most relevant option from the dropdown list.
- Variations: if your product comes in different versions, such as size or color, indicate that here. If not, leave variations disabled.
- Brand Name: enter your brand name if you have one. If the product is unbranded, choose the option indicating that the product does not have a brand name.
- External Product ID: enter the valid UPC or EAN you prepared earlier, then select the correct ID type from the dropdown menu.
If you do have a brand, make sure it matches the branding that will appear on the product or packaging.

Take your time in this section, because the choices you make here affect how the product is classified and identified in Amazon’s system.
Add the Description and Images
Next, move to the Description section. This is where you enter the listing content you already prepared in Step 6.
Paste your optimized text into the appropriate fields, including:
- Product Description
- Bullet Points
Enter your bullet points one by one in the designated fields, adding more as needed.
Then upload your product images in the image area. Amazon allows multiple images, so add the best visuals you prepared earlier. Start with a strong main image, then add supporting images that help explain features, use cases, dimensions, or benefits.

Because you already prepared the content and images in advance, this step should be much easier. At this point, you are no longer planning the listing. You are building it directly inside Seller Central.
Fill in Product Details
After that, move to Product Details. This section contains additional technical and descriptive information about the product.
Depending on the category, the fields may vary, but common examples include:
- Customizations
- Model Number
- Model Name
- Manufacturer
- Generic Keyword
- Special Features
- Style
- Age Range Description
- Material
- Number of Items
- Color
- Part Number

You do not need to invent this information. For technical fields such as model number, manufacturer name, material, dimensions, or included pieces, it is usually best to ask your supplier for the correct data. The more accurate this section is, the more complete and reliable your listing will be.
Complete the Offer Section
Next, open the Offer section. This is where you define the commercial side of the listing.
Common fields here include:
- SKU: create your own internal stock keeping unit for tracking the product.
- Quantity: enter the number of units you plan to make available.
- Handling Time: enter an estimated handling time based on your current shipping and preparation expectations. You can adjust it later if needed.
- Your Price: enter the approximate price at which you expect to sell one unit. You can update it later once you reach the product pricing stage.
- Item Condition: for a new private label product, this is usually New.
You may also see optional pricing fields such as minimum price, maximum price, sale price, or sale dates.

Amazon may also ask how the item will be fulfilled. Since this guide focuses on Amazon FBA, your main path will usually be Fulfilled by Amazon. FBM is still an alternative, but for this process, FBA is the main option to keep in mind.
Complete Safety and Compliance and Submit the Listing
The last major section is Safety & Compliance. This is where Amazon asks for regulatory and safety-related information about your product.
Depending on the category, fields may include:
- Country/Region of Origin
- Are batteries required?
- Dangerous Goods Regulations
- Item Weight
- Compliance-related fields
- other category-specific regulatory information

Not every field will apply to every product, but you should complete all relevant information as accurately as possible.
Complete this section carefully. Some fields may be simple, while others may require data from your supplier or product documentation. If your product falls into a sensitive or regulated category, accuracy here is especially important.
Once all sections are completed, scroll to the end and click Submit to save and create the listing.
Note: After saving or submitting your listing, you can still return to Seller Central later to edit product details, improve content, update images, or adjust offer information if needed.
Once you have completed the safety and compliance section and submitted the listing, you can move forward with much more confidence. By this point, you have already verified that the product can be listed on Amazon under the selected category, so you can now give your supplier the green light to begin final production.
Step 8: Prepare Your Inventory for Amazon FBA
Once you give your supplier the green light to begin the manufacturing process, the next step is to make sure they understand Amazon’s requirements for preparing your inventory.
This includes preparing each product unit correctly, applying the required labels, and packing the inventory into shipping boxes that meet Amazon’s standards.
Understanding Amazon’s prep and barcode requirements and making sure your inventory is prepared accordingly helps your shipment move through Amazon more efficiently and helps you avoid extra costs if Amazon finds that your units are non-compliant. In that case, the inventory may be refused, returned, disposed of, or otherwise handled at your expense.
In many cases, you will not handle all of this preparation work yourself. Your supplier can usually take care of much of it, especially packaging, barcode placement, and carton preparation. That is why you need to understand Amazon’s requirements clearly and communicate them to your supplier in advance. This not only helps you avoid prep problems, but also gives you the chance to improve the packaging if you want a cleaner, safer, or more professional presentation for your product.
Understand What Counts as a Unit in Amazon FBA
Before dealing with packaging, it is important to understand what Amazon means by a unit.
In Amazon FBA, a unit is the individual sellable item that Amazon receives, stores, and ships to the customer. That unit might be:
- one single product
- a boxed item
- a bundled set
- a multi-piece product sold together as one offer
This matters because Amazon only sees what arrives at the fulfillment center as a sellable unit. If several pieces are supposed to be sold together, they must arrive as one complete unit, not as loose separate components. If the item is meant to be sold one piece at a time, then each piece must be prepared as its own individual unit.
The easiest way to think about it is this: every unit should reach Amazon already prepared for receiving, storage, and shipping, without Amazon needing to guess how it should be handled.
Choose the Right Packaging for Each Product Unit
Not every product should be prepared in the same way. The right prep method depends on the product’s shape, fragility, exposed parts, and whether it needs to stay grouped as one sellable unit.
In practice, most sellers usually deal with one of these common preparation formats:
- bubble wrap
- poly bags
- small carton boxes
The goal is not to overpack the product, but to choose the type of prep that protects it properly and keeps it compliant with Amazon’s requirements. Amazon states that prep is required when the existing packaging is not sufficient to protect the item during shipping and handling.
When to Use Bubble Wrap
Use bubble wrap when the product needs extra protection against impact, scratches, or breakage.
This is commonly appropriate for:
- fragile items
- products with glass components
- products with exposed or delicate parts
- premium items that need more careful protection
- products with surfaces that scratch or crack easily
Bubble wrap is usually the right choice when the product itself is structurally fine, but needs cushioning during handling and transportation. Amazon says fragile and premium products must be wrapped in bubble wrap or placed in a box so the item is not exposed. If the wrap covers the barcode, extra barcode labeling may be required.
When using bubble wrap:
- cover the unit fully
- keep the wrap secure and tight
- do not leave fragile parts exposed
- make sure the unit is protected well enough for movement and handling
- the wrapped unit should be able to pass Amazon’s 3-foot drop test without the product inside being damaged
If the product contains more than one fragile piece inside the same sellable unit, each part may need protection so the pieces do not damage one another.
Here are a few practical examples showing how bubble wrap may be used to prepare different fragile products before sending inventory to Amazon FBA.


When to Use Poly Bags
Use poly bags when the product needs containment, grouping, or surface protection.
This is common for:
- soft goods
- small items with loose parts
- products that may get dusty or dirty
- products sold as a set
- some liquids or spill-prone items
A poly bag is useful when the product does not necessarily need rigid protection, but still needs to stay enclosed, complete, and clean throughout the FBA process. Amazon’s bagging requirements also make clear that certain products, including some liquid items, may require this kind of prep and extra spill protection.
When using poly bags:
- use a bag that fits the product properly
- close it securely
- make sure all parts stay contained inside
- avoid loose or badly fitted bags
- if the bag opening is 5 inches (12.7 cm) or more when measured flat, it must include a suffocation warning
- the warning can be printed directly on the bag or attached as a label
- the bag must be at least 1.5 mil thick
The purpose is not just to cover the product, but to keep the unit secure, complete, and ready for FBA handling.
Below are a few practical examples showing how poly bags can be used to protect, contain, or group products properly before sending inventory to Amazon FBA.


When to Use Small Carton Boxes
Use a small carton box when the product needs stronger structural protection than a bag or simple wrap can provide.
This is often the better choice for:
- delicate items
- high-value items
- products with multiple pieces
- products that could be crushed during handling
- items that need more rigid support
A small carton box is especially useful when the product must be kept stable and protected from pressure, impact, or internal movement.
A good small box should be:
- sturdy
- properly closed
- sized well enough to protect the item
- strong enough to reduce movement inside
- strong enough to withstand the 3-foot drop test without the product inside being damaged
- if the product weighs more than 10 lb (4.5 kg), it should be packed in a double-wall corrugated box
If the product shifts too much inside the box, the prep is usually not good enough yet.
Here are a few practical examples showing when a small carton box can provide better protection than simpler prep methods before sending inventory to Amazon FBA.


Follow Amazon’s General Unit-Level Packaging Rules
Even though prep methods differ from one product to another, some general rules apply across almost all FBA inventory. Amazon’s packaging guidance covers loose products, sold-as-set items, boxed units, poly-bagged units, bubble wrap, sharp products, and other prep-sensitive categories.
At the unit level:
- do not send loose components that can separate easily
- keep sets and bundles together as one sellable unit
- do not leave exposed parts vulnerable to damage
- make sure the product is protected for shipping and handling
- prepare the unit for e-commerce fulfillment, not just for shelf display
This last point is especially important. Some products may look fine on a store shelf or in a supplier showroom, but that does not mean they are ready for Amazon FBA.
A product that looks acceptable in a display setting may still arrive damaged, split apart, or unscannable once it passes through storage, sorting, and shipping.
A useful standard to remember is this: each unit should reach Amazon in a condition that makes it easy to receive, safe to store, and ready to ship.
Before moving on to barcodes and outer shipping cartons, here is a quick summary of the most important inventory preparation requirements.
| Prep Element | When You Need It | What to Check |
|---|---|---|
| Poly bag | Product is exposed, loose, or has multiple parts | Sealed properly, suffocation warning if opening ≥ 5 inches, 1.5 mil thickness |
| Bubble wrap | Product is fragile, glass, ceramic, or has exposed parts | Fully covered, minimum 2 layers, must pass 3-foot drop test |
| Small carton box | Fragile items that fail the drop test, hazardous liquids, or vinyl records | 6-sided sturdy box, double-wall corrugated box for items over 10 lbs |
| FNSKU barcode | Each unit sent to Amazon when FNSKU labeling is required | Visible, flat surface, cover other barcodes, avoid edges and corners |
| Sold as set label | Multiple pieces must stay together as one sellable unit | Clear label such as “Sold as a set” or “Do not separate” |
| Outer carton label | Shipping multiple units in one master carton | Match the shipment plan and place one on every carton |
| Box dimensions and weight | Before sending cartons to Amazon | Max 50 lbs, no single dimension over 25 inches |
Add the Correct Barcode to Each Unit
Once the product is packaged correctly, the next priority is making sure each unit has the correct barcode.
This is one of the most important parts of the prep process, because the barcode is what allows Amazon to receive the unit correctly, track it through the system, and match it to the right inventory. Amazon states that every unit sent to a fulfillment center must have a scannable barcode.
Amazon has also updated its barcode policy. Since March 31, 2026, only brand owners can continue using manufacturer barcodes without stickers, while resellers are required to use Amazon barcodes (FNSKU) even if the product already has a manufacturer barcode.
For this reason, the barcode you should focus on in this guide is the Amazon barcode (FNSKU). In the next step, we will see how to create this FNSKU.
Barcode Placement Rules
Just as important as the barcode itself is where it is placed.
The barcode on each unit should be:
- visible
- easy to scan
- placed on the outside of the unit
- not hidden on a fold, edge, or awkward surface
You should also:
- cover or remove any other barcode that could be scanned by mistake
- avoid leaving multiple visible barcodes on the same unit
- make sure the barcode remains readable after prep and packaging
The practical goal is simple: when Amazon receives the unit, there should be one clear barcode outcome, not multiple scan options that create confusion.


Prepare the Outer Shipping Boxes Properly
After each unit is correctly packaged and labeled, place it into outer shipping boxes.
Even with proper unit prep, weak or poorly packed cartons can still cause problems during transport and receiving.
Your outer cartons must be:
- sturdy and in good condition
- appropriate for the weight and contents inside
- free from holes, tears, or weak structure
- packed so units are secure and not shifting excessively
- free from old labels or scannable barcodes that could cause confusion
Amazon also requires accurate box weight and dimensions for all shipments. Overweight carton policies are strictly enforced.
The goal is simple: each carton must survive the shipping journey without collapsing, opening, or creating confusion during receiving.
Note: At this stage, you are only preparing the cartons physically. The actual shipping plan and shipment labels come in the next step.
Avoid Common Inventory Preparation Mistakes
A lot of FBA receiving problems come from avoidable prep mistakes.
The most common ones include:
- using the wrong prep type for the product
- sending fragile items without enough protection
- leaving multiple visible barcodes on the unit
- placing the barcode where it is hard to scan
- sending sets or bundles without securing them as one unit
- using weak or poorly packed outer cartons
- relying on shelf-ready packaging that is not strong enough for FBA handling
Another common mistake is assuming the supplier already understands exactly how Amazon wants the product prepared.
Do not assume your supplier has prepared everything exactly the way Amazon requires. Ask for photos or a short video of the final unit prep, barcode placement, and carton packing before the shipment leaves the factory.
That one step can help you catch mistakes early, request corrections in time, and avoid much bigger problems once the shipment is already on its way.
Finish Preparing Your Inventory Before Creating the Shipping Plan
By the end of this step, each product unit should be:
- properly packaged
- correctly barcoded
- physically ready to be packed into compliant outer cartons
That means your inventory is now prepared at the unit level, which is exactly where this step should end.
The next step is different. In Step 9, you will create the actual FBA shipping plan inside Seller Central, generate the required shipment labels, and move from prepared inventory to a shipment that is ready to send to Amazon.
Step 9: Create Your FBA Shipping Plan and Send Inventory
Once your inventory has been prepared according to Amazon’s requirements, the next step is to create your shipping plan in Seller Central and officially tell Amazon what you are sending to its fulfillment network.
This is the stage where you confirm which product you are shipping, how many units and boxes you will send, how the shipment is packed, and how it will be transported to Amazon.
Accuracy matters here just as much as it did in the prep stage. If the packing details, box quantities, labels, or shipping selections do not match the physical shipment prepared by your supplier, the process can become confusing and lead to delays, extra costs, or shipment problems later on.
In this step, you will create the shipment, review the available shipping options, generate the required labels, and prepare the shipment for handoff to the carrier.
Open the Shipping Workflow for Your Product
To begin, log in to your Amazon Seller Central account and go to Inventory > Manage All Inventory.
Find the product you previously listed, then click the Replenish inventory link shown next to it.

This will open the shipping workflow for that product and take you to the first stage of creating your FBA shipment.
Step 1 — Choose the Inventory You Want to Send
Once the shipping workflow opens, your product will appear inside the shipment setup page, where you will begin entering the basic details of the inventory you want to send.
At the top of the page, complete the following fields:
- Ship from: enter the address from which your supplier will send the inventory
- Marketplace destination: select the marketplace where you want Amazon to receive the shipment
- Packing details: choose how the products are packed inside the shipping cartons

In the Packing details dropdown, Amazon shows two options:
- Individual units: use this when the shipping boxes are not packed in one uniform case-pack configuration. This includes boxes with different SKUs, different conditions, or different quantities from one carton to another.
- Create new packing template: use this for case-packed shipments, where the shipping boxes contain identical items with matching SKUs in the same condition, and each box is packed the same way.


Because this shipment is packed in uniform shipping boxes, select Create new packing template.
Once you do that, Amazon will open a separate window where you can define the packing configuration for your shipment.

In this window, fill in the following details:
- Packing template name: choose a simple name that helps you identify this box setup later
- Template type: keep it as Case pack if all boxes contain the same product in the same quantity
- Box dimensions: enter the outer dimensions of one shipping box
- Box weight: enter the total packed weight of one box
- Who labels units?: select By seller if the supplier will apply the unit labels before shipping
After entering the required details, click Save to create the packing template and return to the shipment setup page.
After saving the packing template, Amazon will return you to the shipment setup page.
Now complete the Quantity to send section:
- Boxes: enter the total number of shipping cartons in the shipment
- Units: Amazon will calculate this automatically based on the number of units per box in your packing template

Once the quantity is correct:
- click Ready to send
- review the totals shown on the page
- then use Print all SKU labels to generate the unit label file
- and click Confirm and continue to move to the next step

Print all SKU labels is the file that contains the barcode labels for the individual units in your shipment. This is the same barcode file explained in the previous step, and it should be sent to the supplier so it can be printed or applied to each unit before shipment.
Note: If some shipping boxes contain a different number of units than the others, do not group them under the same case-pack setup. For example, if most of the shipment is packed as 30 units per shipping box, but one final carton contains only 20 units, that box should be entered separately. In the Information/action section, click More inputs, choose Add packing line, and create a separate packing template for the boxes that follow a different unit count.
Step 2 — Confirm Shipping
After you finish entering your shipment quantities and click Confirm and continue, Amazon will take you to the next stage of the workflow: Step 2 — Confirm shipping.
At this stage, you will review the next shipment settings and decide how the inventory will be sent into Amazon’s fulfillment network.
Start by completing the following fields:
- Ship date: enter the estimated date when your supplier or carrier is expected to hand the shipment over for transport
- Shipment method: choose where the inventory will be sent within Amazon’s network
Amazon will usually show two shipment method options here:
- Amazon fulfillment center: this is the standard option for inventory that is ready to be received and sold through FBA
- Amazon Warehousing and Distribution (AWD): this is a separate option designed for bulk storage and Amazon-managed distribution
For the workflow covered in this guide, the main option to focus on is Amazon fulfillment center, since this is the standard path used to send inventory directly into FBA.

Understand the Inbound Placement Service Fee
After selecting the shipment method, Amazon will ask you to choose an inbound placement service option.
This determines how your inventory will be distributed across Amazon’s fulfillment network and can affect both your shipment structure and your total inbound cost.
Amazon presents two main options here:
- Amazon-optimized shipment splits: your shipment is divided across multiple fulfillment locations. In this case, the placement fee may be reduced or even zero, but you may need to ship to more than one destination.
- Minimal shipment splits: your inventory is sent to fewer locations, which makes the shipment simpler to manage, but Amazon charges an inbound placement service fee for that convenience.
In simple terms, this is a trade-off between:
- lower placement fees but more shipment splits
- or fewer shipment splits but a higher placement fee
For most beginners, the best choice depends on what matters more at this stage:
- keeping the shipment as simple as possible
- or keeping the total inbound cost lower
If you are working with a supplier and want a simpler shipping arrangement, a lower-split option may feel easier to manage. But if reducing fees is the priority, the Amazon-optimized split may be more cost-effective.

Choose the Shipping Mode and Carrier
Once the inbound placement option is selected, the next step is to choose the shipping mode and the carrier.
Amazon shows two shipping mode options:
- Small parcel delivery (SPD): use this when the shipment is sent as separate cartons through a parcel carrier
- Less than and full truckload (LTL/FTL): use this for much larger freight shipments that move by pallet or truck
For most first shipments, Small parcel delivery (SPD) is the most practical option.
After that, choose the carrier:
- UPS (Amazon partnered carrier): this is usually the easiest option for beginners, because Amazon provides discounted rates, label generation, and integrated tracking
- Non-Amazon partnered carrier: use this if you are arranging transportation outside Amazon’s partnered carrier program
In most beginner cases, UPS (Amazon partnered carrier) is the simplest option.
One important detail to remember is that the UPS partnered rate shown by Amazon usually covers the transport itself, but does not include pickup from the supplier’s location.

Review the Charges and Confirm the Shipment
After selecting the shipping mode and carrier, Amazon will show the shipment review page.
This is where you should carefully review the final shipment details before confirming anything. Check that the following information is correct:
- ship-from address
- destination
- number of boxes
- number of units
- shipment contents
- total weight
- selected carrier
- estimated charges
On the same page, Amazon will also display the applicable totals, which may include:
- prep and labeling fees
- placement fees
- estimated shipping fees
Once everything looks correct, click Accept charges and confirm shipping.
This final confirmation completes the shipment setup and moves the workflow to the label-printing stage.

Print the Final Box Labels
After you confirm the shipment, Amazon will display the option to Print box labels.
At this stage, choose the appropriate print format. In most cases, the recommended option is:
- Thermal printing — 4 x 6 inches
Then click Print to generate the file.
These are not the unit barcode labels you created earlier. Instead, this file is for the external shipping cartons and is used so Amazon and the carrier can identify each carton correctly during transport and receiving.
This file typically includes the labels that need to be placed on each outer shipping box, so it must be sent to your supplier and applied to every carton before the shipment is handed over to the carrier.

Shipment Handover and Tracking
Once the final box labels have been generated, send the label file to your supplier so the required labels can be applied to every outer shipping box before handoff.
At this point, your supplier should make sure that:
- all unit labels have already been applied to the individual products
- all final box labels have been placed on the outer shipping cartons
- the shipment matches the quantities and carton setup confirmed in Seller Central
Bear in mind that the discounted shipping rate under the Amazon Partnered Carrier program (UPS) usually does not include pickup from the supplier’s location.
For that reason, you may need to instruct the supplier to deliver the shipment to the nearest authorized UPS drop-off location, unless a separate pickup arrangement has been made.
When the shipment is handed over, UPS will scan the external box label generated through Seller Central, which identifies it as a prepaid shipment under the Amazon Partnered Carrier program.
Once that scan is completed, the tracking information will begin updating inside Seller Central and the shipment will move into the shipping process.
From that point on, your role is mainly to monitor the shipment until it reaches the Receiving stage and the units begin appearing in your FBA inventory.
Step 10: Set the Right Price for Your Product
After creating your listing and preparing your shipment, the next step is to set a selling price that makes sense both financially and competitively.
Many beginners make one of two mistakes here: either they copy competitor prices without understanding their own costs, or they choose a random number that simply feels right. A better approach is to start with your own numbers first, then use the market and Amazon’s calculator to test whether the price is actually workable.
Start with Your True Cost Per Unit
Before you can choose a selling price, you need to know how much one unit really costs you.
Let’s say you ordered 200 units of your product. Based on the example used in this guide, your total landed cost is $1,462, which means your true cost per unit is $7.31 before Amazon selling fees.
Break-Even Snapshot
| Cost Item | Total Cost | Per Unit |
|---|---|---|
| Product Cost (COGS) | $1,000 | $5.00 |
| International Shipping to Amazon | $450 | $2.25 |
| Other allocated costs (for example, UPC barcode cost) | $12 | $0.06 |
| Total Cost to Reach Amazon Warehouse | $1,462 | $7.31 |
| Estimated FBA Fulfillment Fee | — | $3.50 |
| Estimated Referral Fee | — | $2.25 |
| Estimated Break-Even Cost Per Unit | — | $13.06 |
Estimated break-even price: about $13.06 per unit. Use Amazon Revenue Calculator to test whether your planned selling price still leaves enough room for profit and PPC.
Choose an Initial Test Price
Once you know your true cost per unit, the next step is to choose a starting price idea.
If you begin with around 20% above your cost, then $7.31 × 1.20 = $8.77. This gives you an initial test price — not your final price, just a starting point for the calculator.
Important: The break-even snapshot above shows that your estimated break-even point is about $13.06 per unit. That means $8.77 is below break-even. This is intentional. The purpose of this first number is not to become your launch price, but to give you a lower starting point for testing. From there, you raise the price in the calculator until the numbers become workable.
At this stage, remember that your price must also leave room for PPC advertising. Even if a price looks acceptable after Amazon’s fees, it may still be too weak once advertising starts.
For example, if you want to reserve around 10% to 15% of the selling price for PPC, that amount must also come out of your margin. So when testing a price, do not ask only whether it survives Amazon’s fees. Ask whether it still leaves enough room for advertising too.
Use Amazon Revenue Calculator to Test That Price
Now open Amazon Revenue Calculator and search for a product similar to yours using its ASIN or product name.

After selecting the product, the calculator will load the main fee and profitability data based on that listing, which gives you a practical starting point for testing your own price.

At this point, focus on the results that matter most for your pricing decision:
| What to Review in the Calculator | Why It Matters |
|---|---|
| Referral fee | Shows Amazon’s selling commission |
| FBA fulfillment fee | Shows the cost of handling and delivering the unit through FBA |
| Inbound-related cost, if applicable | Helps you understand the effect of inbound placement and related costs |
| Net profit | Shows how much money remains after Amazon’s fees |
| Net margin | Shows whether the price is healthy enough overall |
The important idea here is simple: you do not take these Amazon fees and add them again on top of your price manually. Instead, you use the calculator to answer one practical question: if I sell at this price, what will actually remain for me after Amazon’s fees?
This is the real purpose of the tool.
Adjust the Price Until the Numbers Make Sense
If the calculator shows that the remaining profit is too small, then your first price idea is not strong enough.
In that case, raise the price a little and test again. For example, you may move from $8.77 to $10.99, then $12.99, then $14.99, checking the result each time.
What you are looking for is not just a price that is technically profitable. You are looking for a price that covers your real cost per unit, accounts for Amazon’s fees, leaves enough room for early advertising, and still feels realistic in the market.
Compare with the Market
Once the calculator shows a healthier result, compare that price with similar products in your niche.
Look at products that are close to yours in quality, size, quantity, packaging, and overall offer. This helps you judge whether your price still feels realistic.
Do not copy competitor pricing blindly. If your product needs to be priced much higher than similar listings just to remain profitable, the real issue may not be pricing alone. It may be your product cost, shipping cost, or overall sourcing setup.
Remember That Launch Price Is Not Always Final Price
Your launch price does not have to be the exact price you keep forever.
In many cases, sellers start with a more competitive price to help the product gain traction, then review the price later once they have clearer data from sales, conversion, and advertising performance. What matters is that even your launch price should still be based on real numbers, not guesswork.
Apply the Final Price in Seller Central
Once you are satisfied with the result, go back to your Amazon account and apply the final price to the listing. Go to Inventory, open Manage All Inventory, find your product, and enter the final price in the Price or Your Price field.
That way, your selling price is based on real costs, Amazon fee estimates, and a more realistic launch strategy instead of guesswork.
Step 11: Launch Your Product with Amazon PPC
Once your product is live, the next step is to start driving traffic to it. At this stage, your listing is still new, which means it has no sales history, no review base, and very limited organic visibility in Amazon search results.
This is why Amazon PPC matters at launch. Instead of waiting for your product to rank on its own, PPC helps place it in front of shoppers immediately through Sponsored Products ads. Each paid impression creates a chance for a click, and each click creates a chance for a sale. Over time, those sales can improve your conversion rate, which is one of the key factors behind stronger organic ranking.

Launching an Automatic Campaign
To launch your first campaign, log in to Amazon Seller Central, go to Advertising, then open Campaign Manager. From there, click Create campaign.

On the campaign type page, choose Sponsored Products, then click Create campaign again to open the setup screen.
The first step is to name your Ad Group. Use a name related to your product, such as the product name or ASIN, so you can recognize it easily later.

Next, choose where your ads should appear under Sites. Amazon provides two options:
- Amazon: your ads appear on Amazon, including both Amazon retail and Amazon Business
- Amazon Business: this option focuses specifically on business shoppers using Amazon Business

For most new sellers, the standard Amazon option is the better starting choice because it gives broader reach.
After that, click Add and select the product you want to advertise. You can add more than one product to the same campaign if needed.
In the Targeting section, Amazon gives you two options:
- Automatic targeting: Amazon’s algorithm automatically chooses relevant keywords and related products based on your product page
- Manual targeting: you choose the specific keywords or products yourself

For a new product launch, it is usually best to begin with Automatic targeting. Think of this as a scouting phase. Its purpose is to help you discover which search terms and placements can actually drive traffic and sales.
Set the Default Bid
Once Automatic targeting is selected, the next step is to decide how to set your Default bid. This is the maximum amount you are willing to pay in the auction when Amazon competes to show your ad to shoppers.

Amazon gives you two ways to handle this.
Set default bid
Amazon will usually suggest a bid, for example $0.75, and you can either accept it or adjust it.
This bid acts as your entry ticket into the auction. For example, if you bid $0.75 and your competitors bid $0.60 and $0.70, your ad wins the higher position because your bid is the highest. However, Amazon will not always charge you the full $0.75. In many cases, you may pay only slightly more than the next highest competing bid.
If your bid is lower than competing bids, your ad may still appear, but in weaker positions.
Set bids by targeting group
This option gives you more control by dividing the automatic campaign into four groups based on shopper intent:
- Close match: your ad appears for search terms that closely match your product, such as handheld weeder. This is usually the strongest source of direct sales, so it often deserves the highest bid.
- Loose match: your ad appears for broader search terms related to your product, such as garden tools. This traffic can be less focused, so it is often better to keep the bid low here or even deactivate it if it wastes budget.
- Substitutes: your ad appears on the product pages of similar items sold by competitors. This can help you capture attention from shoppers comparing alternatives.
- Complements: your ad appears to shoppers browsing complementary products, such as fertilizer or grass seeds. This placement is usually more useful for visibility than direct conversion, so it often deserves the lowest bid.
A practical launch approach is to place your strongest bid on Close match, while keeping the other groups noticeably lower. For example, you might use a competitive bid such as $0.80 for Close match and a much lower bid such as $0.20 for the other groups.
Choose the Campaign Bidding Strategy
Next, Amazon will ask you to choose a Campaign bidding strategy. This setting controls how Amazon adjusts your bids during the auction.

Amazon provides three options:
- Dynamic bids – down only: Amazon lowers your bid when a click is less likely to convert. For example, if your original bid is $1.00, Amazon may reduce it significantly to avoid unnecessary spend.
- Dynamic bids – up and down: Amazon can both lower your bid and raise it, sometimes by up to 100%, depending on the likelihood of a sale.
- Fixed bids: Amazon uses your exact bid in every auction without adjusting it.
For a first product launch, Dynamic bids – down only is usually the safest choice. At this stage, Amazon still has limited data on your product, so this option helps protect your budget while the campaign is learning.
Adjust Bids by Placement
Under Adjust bids by placement, Amazon allows you to increase your bid by a percentage for certain ad locations.

These placements include:
- Top of search (first page): this focuses on the top sponsored positions on the first page of search results. For example, if your bid is $1.00 and you apply a 20% adjustment, Amazon can bid up to $1.20 for these premium placements. A starting adjustment of around 10% to 20% is often reasonable here.
- Rest of search: this includes the other ad positions throughout the search results.
- Product pages: this refers to ad placements shown inside competitor product listings.
Among these, Top of search is usually the most important placement for a new product launch, because it gives you the best chance to appear in front of high-intent shoppers.
Complete the Final Campaign Settings
Before launching the campaign, complete the remaining settings:
Amazon PPC setup screen showing campaign name, portfolio, start and end dates, and daily budget settings.
- Campaign name: use a clear format such as Auto_Product_Launch_July2026
- Portfolio: use this if you want to group campaigns by product line or category
- Start date: set it to Today
- End date: leave it as No end date
- Daily budget: start with a reasonable budget, usually around $10 to $20 per day

Once everything is ready, click Launch campaign. Amazon will review the ad first, which usually takes anywhere from a few minutes to a few hours before the campaign goes live.
After the campaign starts running, avoid making changes for at least 7 days. This gives Amazon enough time to collect data before you begin analyzing performance.
Downloading the Amazon Search Terms Report
After a full week has passed since launching your campaign, it is time to extract the data Amazon has collected by downloading the Amazon Search Terms Report.
This report is one of the most important parts of your PPC workflow because it shows the actual words and phrases shoppers typed into Amazon before your product appeared or received clicks. In other words, it shows you how real customers are finding your product through search.
To download it, go to Campaign Manager, then select the Measurement & Reporting icon from the side menu and click Ads Reports. After that, click the blue Create report button.
A page will appear where you configure the report settings. Use the following setup:

- Configuration: Sponsored Products
- Report type: Search term
- Time unit: Summary
- Report period: Last 7 days
Once these settings are selected, click Run report in the top-right corner.
After the report is processed, a Download button will appear. Download the file in Excel format so you can begin the analysis.
Analyzing the Report
When you open the Search Terms Excel file, the first column shows the actual customer search terms that triggered your ad, while the remaining columns show the performance metrics for each term.

At this stage, do not treat every number equally. Focus on identifying which search terms are helping the product grow and which ones are simply draining budget.
To find your Golden Keywords, focus on these five key metrics:
- Orders: this is the most important metric. Any keyword that generated sales, even just one order, is already a valuable term.
- ACOS (Advertising Cost of Sales): this is your main profitability indicator. It shows how much you spent on ads compared to the revenue generated. As a general rule, a keyword with an ACOS below your profit margin is more likely to be profitable.
- Clicks: if a keyword generates many clicks and also leads to sales, that usually means your product is appealing to shoppers searching for that term.
- CPC (Cost Per Click): this shows the average amount you pay for each click on a keyword. A keyword that brings sales with a low CPC is especially valuable because it means you are acquiring traffic efficiently.
- CTR (Click-Through Rate): this helps you understand whether shoppers are interested in your listing when it appears for a given search term.
These metrics should be interpreted together, not separately.
| If You See | What It Means | What to Do |
|---|---|---|
| High Orders + Low ACOS | The keyword is generating profitable sales | ✅ Move it to your Manual Campaign, usually under Exact Match |
| Repeated Clicks + Zero Sales | Shoppers are clicking, but the keyword is not converting | ❌ Add it as a Negative Keyword after enough data confirms the pattern |
| Zero Clicks | The keyword may be too weak, too broad, or your listing is not attracting attention | ⚠️ Review your main image, price, title, or bid |
| High ACOS | The cost is too high compared to the sales it generates | 🔻 Lower the bid, monitor it closely, or pause it if the pattern continues |
| Low CTR with High Impressions | Your ad is being shown, but shoppers are not interested enough to click | 📷 Improve your main image, pricing, or listing appeal |
A keyword with strong Orders, a reasonable ACOS, and an efficient CPC is often the kind of term you want to move into your future manual campaign.
On the other hand, if a keyword has many impressions but very few clicks, that may mean your image, title, or price is not competitive for that search. And if a keyword receives a high number of clicks, such as 10 to 15 clicks or more, but generates no sales, it is usually a sign that the term is not a good fit for your product and is wasting budget.
So, do not focus on the keywords with the highest number of impressions. Focus on the search terms that produce the highest number of Orders, the most reasonable ACOS, and the most efficient CPC.
At the same time, treat any keyword that keeps generating clicks without sales as a warning sign. These are the terms that should later be reduced, excluded, or added as negative keywords.
Launching a Manual Campaign
After analyzing the Amazon Search Terms Report, you should now have a set of winning keywords that are already generating sales. The next step is to launch a Manual Campaign focused on these keywords so you can target them more directly and improve your return on ad spend.
Start by copying the search terms that generated orders and showed a reasonable or low ACOS. Then go back to Campaign Manager and create a new campaign, following the same general setup process you used for the automatic campaign.
This time, when you reach the Targeting section, select Manual Targeting, then choose Keyword Targeting.
After that, click Enter list and paste the winning keywords you extracted from your report.

At this stage, you can ignore Product Targeting and leave it for a later campaign if you decide to target specific competitor product pages directly.
When adding these keywords manually, Amazon will ask you to choose a Match Type. The two most useful options at this stage are:
- Exact Match: use this for your best-performing keywords. This tells Amazon that you want your ad to appear only when shoppers type that keyword very closely or exactly.
- Phrase Match: use this when the keyword can still perform well even if shoppers add words before or after it.
For example, if handheld weeder is a winning keyword, Exact Match keeps the targeting tight, while Phrase Match may still allow your ad to appear for searches such as professional handheld weeder tool.
For the Default Bid, it is often a good idea to set a slightly higher bid than the one used in your automatic campaign. Since these keywords have already proven they can generate sales, they deserve a stronger bid and more deliberate control.
At the same time, do not forget to go back to your Automatic Campaign. The weak search terms that generated clicks but no sales should now be added to the Negative Keywords section. This helps you clean the automatic campaign, reduce wasted spend, and focus more of your budget on the new manual campaign built around your stronger keywords.
Final Note Before Moving to the Next Step
At this stage, you are no longer running ads blindly.
You started with an automatic campaign to collect real data, then used that data to identify stronger search terms, build a manual campaign, and remove weak terms from the original campaign. This is what turns PPC from simple ad spending into a structured launch system.
In the beginning, the goal is not to build the perfect campaign from day one. The goal is to collect useful data, improve gradually, and direct more of your budget toward the keywords that are actually helping the product grow.
As your listing begins generating more clicks, sales, and conversion data, your campaigns will become easier to refine. From here, the next step is to strengthen the product’s credibility by generating customer reviews after launch.
Step 12: Automate Review Requests After Launch
Once your ad campaigns are running and the first orders begin to come in, the next step is to start collecting reviews in a consistent and organized way. Reviews play a major role in building trust, improving conversion rate, and strengthening the product’s overall credibility.
Instead of requesting reviews manually, you can use Helium 10’s Follow-Up tool to automate the process. This allows review requests to be sent at the right time without requiring constant manual work, while still relying on Amazon’s official review request system.
To get started, open Follow-Up from the Helium 10 dashboard, then select Email Automation from the sidebar. After that, click New Automation in the top-right corner.

You will then see several template options. Choose Request a Review. This template uses Amazon’s official review request process, which helps keep the message compliant and avoids risky wording that could violate Amazon’s policies.

Important: Amazon strictly prohibits incentivized reviews. Never offer discounts, free products, or any form of compensation in exchange for a review. The Follow-Up tool sends Amazon’s official review request, which helps you stay within those rules.
Next, review the Order Filters section. You will notice that the Discount filter is enabled by default. This prevents review requests from being sent to heavily discounted orders, which helps you avoid any situation that could be interpreted as incentivizing reviews.
After that, configure the Automation Timeline:
- Trigger: Order Placed (default)
- Wait: 5–14 days after delivery (this gives customers time to receive and try the product)
- Action: automatic sending of Amazon’s official review request
Once everything is set, click Save and Exit.

After saving, switch the Status toggle to Active.

Once activated, the system runs in the background, monitors new orders, and sends review requests at the right time, helping you build a steady flow of customer feedback after launch.
Common Amazon FBA Mistakes Beginners Should Avoid
Even if you follow the right steps, Amazon FBA can become expensive if you make poor decisions early. Most beginner mistakes come from moving too fast, ignoring the numbers, or choosing products before understanding the real risks.
Here are the most common Amazon FBA mistakes beginners should avoid:
- Choosing a product based only on personal interest instead of market demand
- Ignoring Amazon referral fees, FBA fulfillment fees, storage fees, and PPC costs
- Underestimating shipping costs, especially for heavy, oversized, or fragile products
- Ordering too much inventory before validating demand and competition
- Choosing restricted, fragile, seasonal, or compliance-heavy products too early
- Copying competitors without improving the offer, packaging, listing, or positioning
- Launching PPC without knowing your break-even point and target margin
- Assuming the supplier understands Amazon’s prep, barcode, and packaging requirements
- Skipping product differentiation and entering the market with a generic copycat product
- Treating Amazon FBA as a shortcut instead of a real business model
- The safer approach is to move step by step: validate the product, understand your costs, confirm supplier reliability, prepare inventory correctly, and launch with a controlled budget.
Amazon FBA Beginner Checklist for 2026
If you are using this as an Amazon FBA for beginners roadmap, use the checklist below to make sure you have covered the fundamentals before and after your first launch.
- Check your eligibility to sell from your country
- Create your Amazon Seller account
- Understand the main Amazon FBA fees and selling costs
- Research and validate a product with real demand
- Confirm that the product is not too risky, restricted, oversized, or fragile
- Shortlist and contact reliable suppliers
- Request samples before placing a full production order
- Prepare and optimize your product listing
- Add your product in Seller Central
- Prepare your inventory for Amazon FBA
- Create your shipping plan and send inventory to Amazon
- Calculate your real unit cost and set a workable launch price
- Launch your first Amazon PPC campaign
- Review your search terms report after collecting data
- Automate review requests after launch
If you can check off these steps, you are no longer guessing. You have a practical roadmap to move forward with more clarity, confidence, and structure.
Final Thoughts
If you’ve been wondering whether Amazon FBA is still worth it in 2026, the answer is yes — but only if you approach it like a real business. Success no longer comes from shortcuts or guesswork. Amazon rewards sellers who research carefully, understand their numbers, and execute with patience.
This guide walked you through the full beginner process: checking your eligibility, creating your account, understanding costs, finding a product, sourcing from suppliers, building your listing, preparing inventory, setting your price, launching PPC, and automating review requests.
Your goal now is simple: focus on the fundamentals. Choose a product with real demand, understand your costs before pricing, build a clear listing, and improve using real data instead of assumptions.
You do not need to do everything perfectly from day one. Follow a structured process, start with a clear plan, launch carefully, and keep improving as you learn what the market tells you.
In the end, selling on Amazon FBA is not about finding one secret trick. It is about making better decisions at each stage and treating your business seriously from the beginning. Do that, and Amazon FBA remains a practical, scalable business model in 2026.
